Showing posts with label vegetarian. Show all posts

Tuesday, May 24, 2022

For a Taste of Italy and Spain, Travel to Your Kitchen

  Getting ready to travel to Italy next week, I remembered my last trip three years ago, a few weeks before the world changed and my overseas travel was limited to webinars and Instagram posts. In the fall of 2019, I visited Piedmont and Milan. 

Walking one day in the courtyard of the Duomo, that wonderful cathedral in the heart of Milan, and the next day descending hand chiseled stairs that led down to an Infernot where farmers stored produce and later wine. 

Before the discovery of the New World, Italian farmers in the Piedmont were digging deep into the sandstone underneath their homes in their own exploration of discovery, building rooms where men gathered to eat, talk and drink wine. All they lacked was air. Without a ventilation system, once the air was used up, the men rushed up those hand chiseled stairs before they passed out.

On that trip, I ate local cheeses, charcuterie, bagna cauda (an anchovy-garlic dip), spaghetti with clams, and so many dishes that made me very happy. When travel was not possible, I satisfied my "hunger" for all things Italian by cooking foods that reminded me of Italy. Last night I made pasta with Italian sausage, butter clams, vegetables and a touch of sweet butter. 

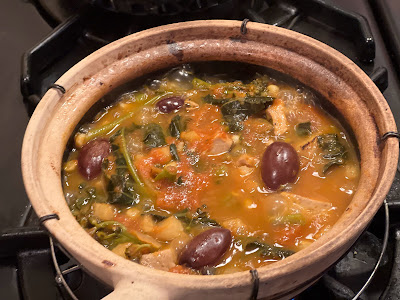
For my wife, who doesn't eat meat, I used a Chinese clay pot to make braised tofu with vegetables, the Spanish spice pimeton and San Marzano tomatoes D.O.P. That brought together China, Spain and Italy in a one pot dish.

Hot Pot Braised Tofu with San Marzano Tomatoes, Vegetables, Olives and Noodles

The cans of San Marzano Tomatoes I was gifted (see at the end, below) had enough tomatoes and sauce for several dishes. What I didn't originally use, separating sauce from tomatoes, I froze in 6 oz and 8 oz containers. Because our sons are fully grown, I cook for two. Whenever I have too much of an ingredient, I place small containers in the freezer, available when I want to create a dinner or lunch.

The San Marzano Tomatoes and sauce froze and reheated with no loss of flavor. 

Clay hot pots are available in Asian markets. Inexpensive, they require a bit of special care. Before using, each time, submerge the clay pot into clean water for 15 minutes. Purchase a wire trivet that you'll place on the stove-top burner. The clay pot goes on top of the wire trivet. Only use a low to medium flame to avoid stressing the clay. Allow the pot to cool before washing to avoid cracking.

If you can find only small clay pots, use two to prepare this dish.

Serves 4

Time to prepare 15 minutes

Time to cook 45 minutes

Total time: 60 minutes

Ingredients

1 cup yellow onions, washed, peeled, roughly chopped

1 cup carrots, washed, ends removed, peeled, roughly chopped

1 cup daikon, washed, ends removed, peeled, roughly chopped

1/2 cup corn kernels, cut off the cob (when available)

1 cup broccolini or broccoli, stems roughly chopped, leaves whole and florets sliced into bite sized pieces

2 cups tofu, preferably firm and organic, washed, cut into bite sized pieces

1 cup San Marzano tomatoes D.O.P., roughly chopped

1/2 cup San Marzano tomato sauce, D.O.P.

2 cups homemade vegetable stock, if none available, use water

1 cup green or black olives, preferably olives with pits

1 pound noodles, dried or fresh

1/2 tablespoon pimeton

Sea salt and freshly ground black pepper to taste

Directions

Heat olive oil in hot pot over medium heat. 

Saute onions.

Add tofu and stir well.

Add pimeton and stir well. Don't burn the spice.

Add carrots, daikon and corn. Stir after each ingredient is added.

Add broccolini or broccoli stems. Stir well and cook to soften.

Add broccoli or broccoli leaves. Sir well.

Add chopped tomatoes and tomato sauce, if frozen, no need to defrost.

Add vegetable stock, if frozen, no need to defrost. If stock unavailable, use water.

Add olives, cover and simmer 30 minutes.

While the tofu is braising, bring a pot of salted water to boil and cook noodles according to the package. 10 minutes if dried, 2-3 minutes if fresh. Drain and set aside.

Remove cover and add cooked noodles.

Stir well to mix together tofu, vegetables and noodles.

Serve hot in bowls.

Please send me recipes and photographs when you make your delicious dishes using Pomodoro San Marzano Dell'Agro Sarmese-Nocerino D.O.P. and I will submit your recipe to enter a contest to win a gift basket of these wonderful D.O.P. San Marzano tomatoes.


The tomatoes I used were provided courtesy of the Consorzio di Tutela del Pomodoro San Marzano dell’Agro Sarnese-Nocerino DOP and ANICAV.

Friday, August 9, 2019

Brighten Spice Up a Summer Corn Salad with Mexican Elote Spices

With an abundance of corn this summer, I've been grilling and salt-boiling corn on the cob.


Seasoned with sea salt and black pepper and, sometimes, with luxurious melted butter, I couldn't be happier. On a trip to Mexico, I enjoyed grilled corn on the cob, elote. That Mexican classic made me think about making a salad that trimmed down on the fat, retained the same spices and built out the flavors.

Mexican street food 

Travel in Mexico and you'll encounter street vendors selling a great number of delicious food snacks. Elote is one of the best. An ear of corn is grilled, dusted with dry cheese, slavered with mayonnaise and seasoned with chili powder and fresh lime juice. The ear of corn is always served whole, sometimes resting in a paper dish or with a stick in the bottom like a corndog.


Elote is delicious but messy to eat. A whole ear of corn takes two hands to manage. And, with each bite, the finely grated Cotija cheese floats into the air, landing on clothing.

Deconstructing elote

Cutting the kernels off the cobs makes the seasoned corn easier to enjoy. In Mexico there is a corn kernel snack called esquires, which employs some of the elote seasonings. The recipe I settled on uses olive oil instead of mayonnaise. That way the salad can be served as a light entrée topped with a protein or as a side dish accompanying grilled vegetables, meats, poultry and fish. A perfect summer recipe.


The best way to cook corn on the cob is a topic of heated debate. There are those who will only boil corn, others who will only grill it. I have seen elote prepared using both. My preference is to strip off the husk and grill the ear so that some of the kernels are charred, adding caramelized sweetness to the salad.

Just the right cheese

What gives elote its distinctive flavor is the combination of spicy chili powder, fresh lime juice and Mexican Cotija cheese. 

Powdery when finely grated, Cotija cheese is salty so you may not need to add salt when you make the corn salad. Often described as having qualities similar to feta and Parmesan, Cotija tastes quite different.


Mexican Corn Salad

Adding finely chopped Italian parsley to the seasoned corn kernels brightens the flavors. Cilantro can be used instead of parsley to give the salad a peppery flavor.

The corn can be prepared ahead and kept in the refrigerator overnight. In which case, do not add the Cotija cheese or parsley until just before serving.

To create a colorful salad, just before serving, toss the seasoned corn and parsley with quartered cherry tomatoes, cut-up avocados and butter lettuce or romaine leaves.

After tossing, taste the salad and adjust the amount of Cotija cheese and chili powder and, if needed sea salt.

Prep time: 10 minutes

Cook time: 15 to 20 minutes

Total time: 25 to 30 minutes

Yield: 4 entrée servings or 8 side dish servings

Ingredients

4 tablespoons olive oil, divided

1/2 teaspoon sea salt 

1/4 teaspoon freshly ground black pepper

4 large ears of corn, husks and silks removed, washed, dried

1/2 cup finely grated Cotija cheese

1/2 teaspoon chili powder

Directions

1. Preheat an indoor grill or outdoor barbecue to hot.

2. Pour 2 tablespoons olive oil into a flat pan and season with sea salt and black pepper.

3. Roll the ears of corn in the seasoned olive oil to coat all sides.

4. Using tongs, place the corn on the grill, turning every 2 to 3 minutes so that some of the kernels char, being careful not to burn the ears.

5. After the corn is cooked on all sides, remove and let cool in the flat pan with the seasoned olive oil.

6. To cut the kernels off the cob, use a sharp chef's knife. Hold each ear of corn over the pan with the seasoned oil and slice the kernels off the cob.


7. Transfer the kernels and the remaining seasoned oil into a large mixing bowl.

8. Add Cotija cheese, chili powder and parsley. Toss well.


9. Drizzle the remaining olive oil over the salad and toss.


10. Serve at room temperature with lime wedges on the side.

Thursday, April 18, 2019

Perfectly Delicious Tea Sandwiches, Ideal for Snacks, Dinner Parties and Picnics on an Airplane

Tea sandwiches aren't just for fancy tea rooms. They are easy-to-make and enjoyable for just about any occasion.  They look elegant, so they enhance a dinner party table. Easy-to-eat, they're ideal for afternoon snacks or picnics.


Usually made with white bread and also called finger sandwiches, the crustless sandwiches have fillings that can feature salmon, beef, tuna, crab, ham, chicken and cucumber. 

Fun to make, delicious to eat

When I'm working at my desk, a plate of tea sandwiches and a cup of hot coffee keep me happy all afternoon.

I have two favorites. One is made with chopped hardboiled eggs mixed together with finely chopped parsley, carrots and capers, flavored with mayonnaise, sea salt and freshly ground back pepper.


The other is as delicious as it is elegantly simple.

Thin radish slices are placed on buttered bread, seasoned with flake salt and freshly ground black pepper. For added flavor, I top the radishes with slices of homemade picked onions. 

On airplanes, I make a picnic lunch to counteract tedium and discomfort. After I'm settled into my too-snug seat,  I look for ways to make the experience more fun. I put on headphones, watch a movie and pamper myself with a meal of tea sandwiches.

No matter the turbulence, the discomfort of sitting too close to a stranger or the lack of leg room, when I'm snacking on my elegant sandwiches, I'm happy.

Quality above all

Tea sandwiches are only as good as the ingredients. 

Ideally the eggs and radishes come from a farmers market or a quality grocery store. Use sweet butter (unsalted), Best Foods/Heilman's Mayonnaise (my preference) and a good quality white bread. Marukai, our local Japanese Market, carries baked goods from MamMoth Bakery.  I use the bakery's thin-sliced white bread. 

Tea sandwiches can be as heavily seasoned as you enjoy, or, like the egg salad and radish sandwiches, lightly seasoned with flake salt (or sea salt) and freshly ground black pepper. 

Pickled Spring Onions

Spring onions are scallions that have matured in the ground and developed a fat bulb.


Thin-sliced pickled spring onions brighten the flavor of the radishes. Prepare them a week before use. Kept refrigerated in a sealed jar, the onions will last for months as their flavor evolves. Besides placing in tea sandwiches, serve the pickled spring onions with seared steak and roast chicken or added to stews.

Only use kosher salt that is additive-free like Diamond Crystal Kosher Salt.

Ingredients

1 bunch spring onions, washed, root ends and discolored leaves removed

2 cups water

2 cups white wine vinegar

1 tablespoon whole black peppercorns

1/4 - 1/3 cup kosher salt, depending on preference

4 dried bay leaves

Pinch hot pepper flakes (optional)

1 tablespoon extra virgin olive oil

Directions

Sterilize a large glass jar by boiling in water or cleaned in dish washer.

Leaving 2" of greens attached to the bulbs, cut off the remaining length. Place the bulbs and all the greens into the jar.

Stir kosher salt into water to dissolve. Mix together with vinegar. Add aromatics and olive oil. Stir well. Since the pickled spring onions will have the same flavor as the brine, taste and adjust seasonings by adding more kosher salt, vinegar or water as desired.

Pour brine into the glass jar. Make more brine if needed to cover the onions. Place into refrigerator for a week before using.

Thin-Sliced Radish and Sweet Butter Tea Sandwiches

These days, there are a great many radish varietals at farmers markets. If you like one of the exotic radishes available, use those. 


For me, a basic red-on-the-outside, white-on-the-inside, fat radish reminds me of the appetizers my dad liked. After a long day at work, he'd settle into his favorite easy chair, sip a Seagram's 7 and 7 and enjoy a pre-dinner plate of appetizers that often included radishes. 


My mom taught me to soak the radishes in clean, cold water for ten minutes. That loosens any dirt so the radishes can be easily cleaned with a damp cloth.


Serve the radishes open faced or sandwich-style. Layer the radishes one-deep or pile them on as much as you like. 

Serves 4-6

Ingredients

1 bunch radishes, greens and root discarded, soaked in cold water 10 minutes, washed clean of any grit

6-8 slices, thin sliced white bread, crusts removed

2 tablespoons sweet butter

Flake salt or finely ground sea salt to taste

Freshly ground black pepper to taste

2 spring onion bulbs, sliced thin (optional)

Directions

Cut the crustless bread slices in half or in quarters. Arrange them on a cutting board and butter them, assemble-line fashion.


Using a sharp knife, slice the radishes into paper-thin rounds.


Arrange the radishes on the buttered bread. Add sliced spring onion onions (optional). Season with flake salt and black pepper. Serve open-faced or as a sandwich.

Egg Salad Tea Sandwiches

Use good quality, extra large eggs and fresh Italian parsley.


The egg salad can be spiced up by adding pepper flakes, curry powder or any spices you enjoy. I prefer a simpler flavoring.

Serves 4-6

Ingredients

6-8 slices, thin sliced white bread, crusts removed

4 extra large eggs

1/4 cup Italian parsley, leaves only, washed, pat dried, finely chopped

1 tablespoon capers, drained, pat dried, finely chopped

2 tablespoons mayonnaise, preferably Best Foods/Hellman's, taste and add more mayonnaise as desired

1 teaspoon kosher salt, preferably Diamond Crystal Kosher Salt

Sea salt, to taste

Freshly ground black pepper, to taste

Directions


Place eggs in a large sauce pan, add kosher salt and cover with water. Place on a high flame, bring to a boil  and cook 10 minutes. Drain eggs and cool with cold water.


When cooled, peel and discard shells.


Finely chop the eggs. Place in mixing bowl. Add parsley, capers and mayonnaise. Mix well. Season to taste with sea salt and freshly ground black pepper.


If not used immediately, refrigerate in an airtight container for up to three days.


Cut the crustless bread slices in half or in quarters. Using a flat knife, spread egg salad on the bread. Serve open-faced or as a sandwich.

Wednesday, January 31, 2018

Go Green for Super Bowl Sunday! And Cook Easy-to-Make Roasted Artichokes

We are planning a Super Bowl Sunday party. My plan is to serve "picnic" food. Carrot salad, potato salad, Little Gem green salad, Persian salad, crispy fried chickenbrown sugar salmon and roasted artichokes.

Super Bowl Sunday food should be fun, delicious and healthy.

Spring is happening and artichokes are showing up in our farmers markets. The dark green vegetable, prized by cooks, is healthy and easy-to-prepare.
Looking at an artichoke, with its hard exterior and sharp pointed leaves makes me wonder how anyone figured out they would be good to eat. With a small amount of effort, that tough looking exterior gives up the wonderfully savory flavor bits at the end of the each leaf.

Choosing a good artichoke

Whether you find one that is the size of your hand or a larger one the size of a soft ball, give it a squeeze. If the artichoke feels solid, you've found a good one. An artichoke past its prime will be squishy like a child's squeeze toy. Make sure all the leaves are green. Don't buy an artichoke with brown or blackened leaves.
Having a sharp pair of scissors or kitchen shears, a pairing knife and a chefs knife will make breaking down the artichoke easy.

Roasted Artichokes

One person can easily eat one artichoke the size of your hand. The larger artichokes will feed 2-3 people as an appetizer or a side dish. 

Serves 4

Prep Time: 10 minutes

Cooking Time: 30-35 minutes

Total Time: 40-45 minutes

Ingredients

4 medium sized or 2 large artichokes, washed
1 tablespoon kosher salt
2 tablespoons olive oil
1 teaspoon sea salt
1/2 teaspoon black pepper
1/4 cup sweet butter (optional)
Directions

Preheat oven to 350F.

Place a large stock pot on the stove on a high flame. Add kosher salt. Bring to a low boil. Cover.

To roast the artichoke sections after boiling, cover the bottom of a baking sheet with parchment paper, a Silpat sheet or a piece of aluminum foil. Set aside.

Using scissors trim off the pointy end of each artichoke leaf.

Trim off the stem of each artichoke, flush to the bottom. Discard the stems.

Give each artichoke a flat-top haircut. Place the artichoke on its side. Using a chefs knife, trim off the top 1/4" of each artichoke and discard.

Place the artichoke on the cutting board. Using a chefs knife, cut each artichoke in half, from bottom to the top. Cut each half into two pieces. If the artichoke is large, cut those four pieces in half, creating eight segments.

Working quickly, because the inside of the artichoke will discolor when exposed to air, use a sharp pairing knife to remove the fuzzy part on the inside of each section. Rinse the artichoke sections and discard the fuzzy parts.

Place all the artichoke sections in the boiling salted water. Cover and cook 10 minutes.

Using the pairing knife, test one of the artichoke sections. The knife should easily go into the fleshy part on the bottom of the leaves. If the knife doesn't go in easily, cook another 5 minutes but beware not to over cook the artichokes. They should be firm not mushy.

Place a colander or strainer in the sink. Pour the hot salted water with the artichoke sections into the colander and drain.

Transfer the artichoke sections to a mixing bowl. Drizzle with olive oil. Season with sea salt and black pepper. Toss well to coat.

Arrange the artichokes on the prepared baking sheet, leaving room between the sections.

Place in the oven and cook 15 minutes. Using tongs, turn the sections over and place back in the oven another 15 minutes so they cook evenly.

If serving with melted butter (optional), melt the butter in a small saucepan being careful to avoid burning.

Remove the artichokes from the oven and serve hot or at room temperature. Accompany with sea salt, black pepper and small dishes of melted butter (optional).

Saturday, June 18, 2016

Father's Day Deserves a Feast, Start with the Grill

Once again I will be out of town on Father's Day. I'll miss being with my sons on that special day. We already have a bealted-Father's Day date two weeks later when we will all be in town. I can hardly wait!

Since Father's Day coincides with the start of summer, grilling is the best way to celebrate male parenting.
For me, nothing is better than a platter of grilled Italian sausages with sautéed onions, deveined shrimp seasoned with olive oil, sea salt and black pepper, corn on the cob, charred red peppers mixed with capers and garlic and lobsters split open and doused with pats of sweet butter.  With a tossed arugula and carrot salad, a loaf of freshly baked bread and a fresh fruit salad and I am happy.
The best grilling is the easiest kind. Buy good sausages, seafood and chicken, drizzle with olive oil, season with sea salt, pepper and any dried herb you fancy, put it on a hot grill, turn diligently to prevent burning and serve when it's done.

When the boys come to the house to celebrate a birthday, mother's day or father's day, they frequently take command of the grill. As my younger son, Michael, reminds me, they are my sons so of course they are good cooks. And that makes me very very happy.

Our other son, Franklin, doesn't regard a meal a proper meal unless there are appetizers. The secret to a great grilled meal is what's served on the side. My contribution to your Father's Day celebration are three of my favorite sides. 

All three are addictive so you may find you'll be eating them all summer long. They are all easy-to-make. The tapenade and lavash crisps can be made a day or two ahead. The grilled corn salsa is best made fresh.


Grilled Corn Salsa

Adding corn caramelized from light grilling gives this salsa it’s distinctive sweetness. When you buy corn from the market, look for plump kernels. Avoid ears with wrinkled or shriveled kernels.
You can use any kind of ripe tomato you enjoy, but I prefer cherry tomatoes because they are sweet and they hold their shape after being cut up. For added color, select a basket with a mix of yellow and red cherry tomatoes.

Serves 4

Ingredients

1 ear of corn, husks and silks removed, washed
1 8 oz basket of ripe cherry tomatoes, washed, quartered
1 large shallot, ends and skin removed, washed and roughly chopped
½ cup Italian parsley, washed, leaves only, finely chopped
¼ teaspoon cayenne
2 tablespoons olive oil
Sea salt and black pepper to taste
Lemon juice to taste (optional)

Directions

Pre-heat the grill to medium-hot.

Drizzle the olive oil on a large plate and season with sea salt and black pepper. Roll the ear of corn to coat. Using tongs, place the corn on the grill.  Turn frequently to prevent burning.  Remove the corn when all the sides have light grill marks. Let cool. Cut off the kernels and place in a large mixing bowl.

Use a rubber or silicone spatula to transfer the seasoned olive oil from the plate into the mixing bowl with the corn.

Add the quartered cherry tomatoes, shallot and parsley. Toss well and season with the cayenne. Taste and adjust the flavors with more sea salt, black pepper, olive oil and lemon juice (optional).

Tapenade with Charred Garlic

A secret weapon in last minute cooking, tapenade brightens any meal either as an appetizer or a condiment. If you use pitted, canned olives, making tapenade will take 10-15 minutes.
The taste of your tapenade depends on the quality of the olives.

Serves 6-8

Ingredients

1 can pitted olives, drained weight 6 oz., preferably green or kalamata olives
2-3 tablespoons olive oil
2 garlic cloves with skins
¼ cup Italian parsley, washed, leaves only, roughly chopped
¼ teaspoon pepper flakes (optional)
Black pepper to taste

Directions

Skewer the garlic cloves on the end of a knife or a metal skewer and hold over a gas flame to burn off the outer skins. Let cool, remove any pieces of charred skin and roughly chop the cloves.

In a small blender or food processer, place the drained olives, olive oil, garlic, parsley and pepper flakes. Pulse until the olives are roughly chopped. Taste and adjust the seasoning with the addition of black pepper, sea salt, pepper flakes and olive oil.

Pulse again until the tapenade achieves the desired texture. Personally I like a tapenade that has a rustic look with the olives coarsely chopped rather than puréed.

Refrigerate until ready to use and serve at room temperature.

Variations

 2 anchovies packed in oil, roughly chopped and added with the olives. If salted, rinse before adding.

1 tablespoon capers added with the olives.

Lavash Crisps

Served in the Middle East, lavash and pita are commonly used instead of bread. Flat, unleavened lavash has a delicious, lightly grilled flavor when fresh. Making crisps makes use of lavash that might otherwise have gotten stale and gone to waste.
Lavash crisps have more flavor and are more flaky than commercially manufactured chips. Serve them with salsa, tapenade, dips or thin slices of cheese.

The crisps will last for weeks if kept refrigerated in an airtight container. 

Serves 6-8

Ingredients

1 large or 2 small sheets of lavash
1 cup olive or safflower oil
Sea salt and black pepper to taste
5-6 paper towel sheets

Directions

Cut the lavash sheets into 2” squares by cutting the sheet in half, placing the halves on top of each other, cutting those in half and doing that again until the pieces are 2” wide. Cut the 2” wide strips into 2” squares and set aside. If not cooked immediately, store in an airtight container.

In a large frying pan or griddle, heat ¼ cup of the oil. Season with sea salt and black pepper and heat on a medium-low flame. Be careful not to burn the oil or cause it to smoke.

Lay a paper towel sheet on a large plate or baking sheet.

Add the lavash squares to the hot oil. Do not overlap. Using tongs, turn over the lavash when they are lightly browned and cook the other side. They cook quickly so watch them closely.

Remove the cooked crisps and place them on the paper towel. Cook another batch. Place a clean paper towel on top of each layer to absorb excess oil.

Replenish the oil in the frying pan as needed and season with sea salt and black pepper. Allow the oil to reach the proper temperature before adding more lavash.

Discard the paper towels when the crisps cool. Store refrigerated in an airtight container. Serve at room temperature.

Wednesday, May 4, 2016

Go Green! And Cook Easy to Make Roasted Artichokes

Spring is happening and farmers markets are filling up with artichokes. The dark green vegetable, prized by cooks, is healthy and easy to prepare.
Looking at an artichoke, with its hard exterior and sharp pointed leaves makes me wonder how anyone figured out they would be good to eat. With a small amount of effort, that tough looking exterior gives up the wonderfully savory flavor bits at the end of the each leaf.
Choosing a good artichoke

Whether you find one that is the size of your hand or a larger one the size of a soft ball, give it a squeeze. If the artichoke feels solid, you've found a good one. An artichoke past its prime will be squishy like a child's squeeze toy. Make sure all the leaves are green. Don't buy an artichoke with brown or blackened leaves.
Having a sharp pair of scissors or kitchen shears, a pairing knife and a chefs knife will make breaking down the artichoke easy.

Roasted Artichokes

One person can easily eat one artichoke the size of your hand. The larger artichokes will feed 2-3 people as an appetizer or a side dish. 

Serves 4

Ingredients

4 medium sized or 2 large artichokes, washed
1 tablespoon kosher salt
2 tablespoons olive oil
1 teaspoon sea salt
1/2 teaspoon black pepper
1/4 cup sweet butter (optional)
Directions

Preheat oven to 350F.

Place a large stock pot on the stove on a high flame. Add kosher salt. Bring to a low boil. Cover.

Using scissors trim off the pointy end of each leaf.

Trim off the stems of each artichoke, flush to the bottom. Reserve the stems.

Trim off the top 1/4" of each artichoke and discard.

Using a chefs knife, cut each artichoke in half, from bottom to the top. Cut each half into two pieces. If the artichoke is large, cut those four pieces in half, creating eight segments.

Working quickly because the inside of the artichoke will discolor when exposed to air, use a sharp pairing knife to remove the fuzzy part on the inside of each section. Discard.

Place all the artichoke sections and the stems in the boiling salted water. Cover and cook 10 minutes.

Cover the bottom of a baking sheet with parchment paper, a Silpat sheet or a piece of aluminum foil.

Using the pairing knife, test one of the artichoke sections. The knife should easily go into the fleshy part on the bottom of the leaves. If the knife doesn't go in easily, cook another 5 minutes.

Place a colander or strainer in the sink. Pour the water with the artichoke sections into the colander and drain.

Transfer the artichoke sections and stems to a mixing bowl. Drizzle with olive oil. Season with sea salt and black pepper. Toss well to coat.

Arrange the artichokes and stems on the prepared baking sheet.

Place in the oven and cook 15 minutes. Using tongs, turn the sections over and place back in the oven another 15 minutes so they cook evenly.

If serving with melted butter (optional), melt the butter in a small saucepan being careful to avoid burning.

Remove the artichokes from the oven and serve while hot. Accompany with sea salt, black pepper and small dishes of melted butter (optional). Trim the stems down to the round center, chop and use in a salad.

Saturday, March 26, 2016

Roasted Winter Vegetables Brighten Up Any Meal

At holidays,  delicious hams, turkeys and roast meats take center stage at the table. A bone in ham, crusted on the outside with brown sugar and spices, turns sweet on the inside after a generous amount of oven roasting. Turkeys, basted and browned, arrive at the table warm, moist, sliced and ready to eat. As much as I love those entrees, what brings a meal to perfection are the side dishes.
Infinitely variable, side dishes range from steamed rice, which goes with just about anything, to spicy kimchi flavored vegetables. For Sunday dinner I like to keep the sides simple.

Today I made two dishes that I really enjoyed. Roasted Brussels sprouts, sliced thin and tossed with yellow onions, dressed with olive oil and seasoned with sea salt and black pepper come out of the oven tender in the center and crisp on the edges. The same technique worked well with green cabbage, sliced like slaw, thin and long, tossed with onions and dressed the same as the Brussels sprouts.

Served separately, they were joined on the plate with a roast chicken with crispy skin and soft, sweet meat. If umami exists in a single dish, the chicken with its two sides was umami on a plate.

Easy to prepare and delicious, the sides are perfect for an Easter lunch, Christmas dinner or any meal in between.

Roasted Shredded Brussels Sprouts

Use any size sprouts available in a farmers market. I was lucky enough to find large ones that were easy to slice. Besides trimming off the end of the stem, also peel away and discard any of the outer leaves that have yellowed.

Serves 4

Prep time: 10 minutes

Cooking time: 60 minutes

Total time: 70 minutes

Ingredients

2 pounds Brussels sprouts, washed, trimmed
1 medium yellow onion, root end and outer skin removed, washed
2 tablespoons olive oil
Sea salt to taste
Black pepper, freshly ground, to taste

Directions

Pre-heat the oven to 400 F.

Line a large roasting pan with a Silpat sheet or parchment paper.

Using a sharp chefs knife, slice the Brussels sprouts and onion lengthwise as thin as possible.

Place the shredded Brussels sprouts and onion slices in a mixing bowl, drizzle with olive oil and season with sea salt  and black pepper. Toss well.
Spread out on the lined roasting pan. As much as possible, do not let the Brussels sprouts overlap. They are more likely to crisp if they do not cover one another.

Place in the oven. After 30 minutes, use metal tongs to turn over the Brussels sprouts and return to the oven.

When they are crisp along the edges but not dried out, remove from the oven and place in a bowl.

Serve hot.

Roasted Green Cabbage Slaw

At the farmers market, select a cabbage that is firm and about 6-8" in diameter.
Serves 4

Prep time: 10 minutes

Cooking time: 60 minutes

Total time: 70 minutes

Ingredients

1 green cabbage head washed, yellowed outer leaves removed
1 medium yellow onion, root end and outer skin removed, washed
2 tablespoons olive oil
Sea salt to taste
Black pepper, freshly ground, to taste

Directions

Pre-heat the oven to 400 F.

Line a large roasting pan with a Silpat sheet or parchment paper.
Using a sharp chefs knife, cut the cabbage head in half lengthwise. Using a paring knife, make a triangular cut at the bottom of the cabbage to remove the thick stem at the bottom. Save to use in soup or discard.

Place each half of the cabbage flat side down on a cutting board. Using the chefs knife, make very thin slices, cutting from the top to the bottom until you have shredded both halves of the cabbage.
Slice the onion in the same manner.

Place the shredded cabbage and sliced onion into a large mixing bowl, drizzle with olive oil and season with sea salt  and black pepper. Toss well.

Spread out on the lined roasting pan. As much as possible, do not let the cabbage slices overlap. The cabbage and onions are more likely to crisp if they do not cover one another.

Place in the oven. After 30 minutes, use metal tongs to toss the cabbage and onions. Return to the oven.
When the cabbage slices and onions are crisp along the edges but not dried out, remove from the oven and place in a bowl.

Serve hot.