Thursday, December 5, 2019

New York City Restaurant Recommendations for an LA Friend Who Is Visiting the City

Ever since I was a babe-in-arms, I have visited New York every year from my home in Los Angeles.  I grew up visiting New York City because my grandmother lived on 110th close to Amsterdam, with a view of St. John the Divine. 


For several years I taught at RIC in Providence, R.I., so I visited more frequently. Since I am now LA-based, on average I visit the city at least twice a year. 


When I visit, it's only for a few days, which means I walk a lot (LA is a city-for-cars-only) and I revisit my favorites. 

New York City has thousands of restaurants and millions of residents and visitors. Everyone has their favorite restaurants. These are mine.

Downtown

Chinese, Japanese and Vietnamese (you can see posts on Instagram - mr.manmade):


87 Baxter Street, NYC 10013
212) 233-5948
#18 salt/pepper shrimp + order a plate of steamed rice
The shrimp arrive on a mountain of shredded lettuce. Delicious. Add shrimp, lettuce and rice together for a tasty treat. The menu has all the Vietnamese favorites (pho, vermicelli noodle dishes and rice with bbq meats) as well as some Chinese dishes. Be careful about the steps from the sidewalk into the restaurant. 


40 Bowery south of Canal Street,  NY 10013,  (646) 683-0939
Great noodles and pork filled dumplings. I always get the ground pork in sauce with bok chow with noodles. So delicious. And a side order of pork filled dumplings (steamed). Frozen dumplings (meat and vegetarian) can be purchased to bring home. I always bring freezer packs so I can carry him a package of frozen dumplings in my suitcase.


1 Doyers Street NYC 10013
212/791-1817
I like the pork soup with #1 noodles and pork dumplings. The soup is to-die-for delicious.  I’ve had rice with vegetables and meat and also noodles with the same combination. Dishes featuring soup, rice or noodles are all good. It just depends what you're in the mood for. The plates are large so come with a friend. 


The street level dining room is tiny. When they are busy, which they are often, there is a “cozy” dining room downstairs that is more comfortable than you would expect as you descend the narrow staircase lined with boxes.


Tasty Hand-Pulled Noodles is on the same tiny street as Nom Wah Tea Parlor, a tourist favorite, which I think is pricey for the dim sum you get, but the interior is fun. 13–15 Doyers Street, NYC 10013, (212) 392-6800.


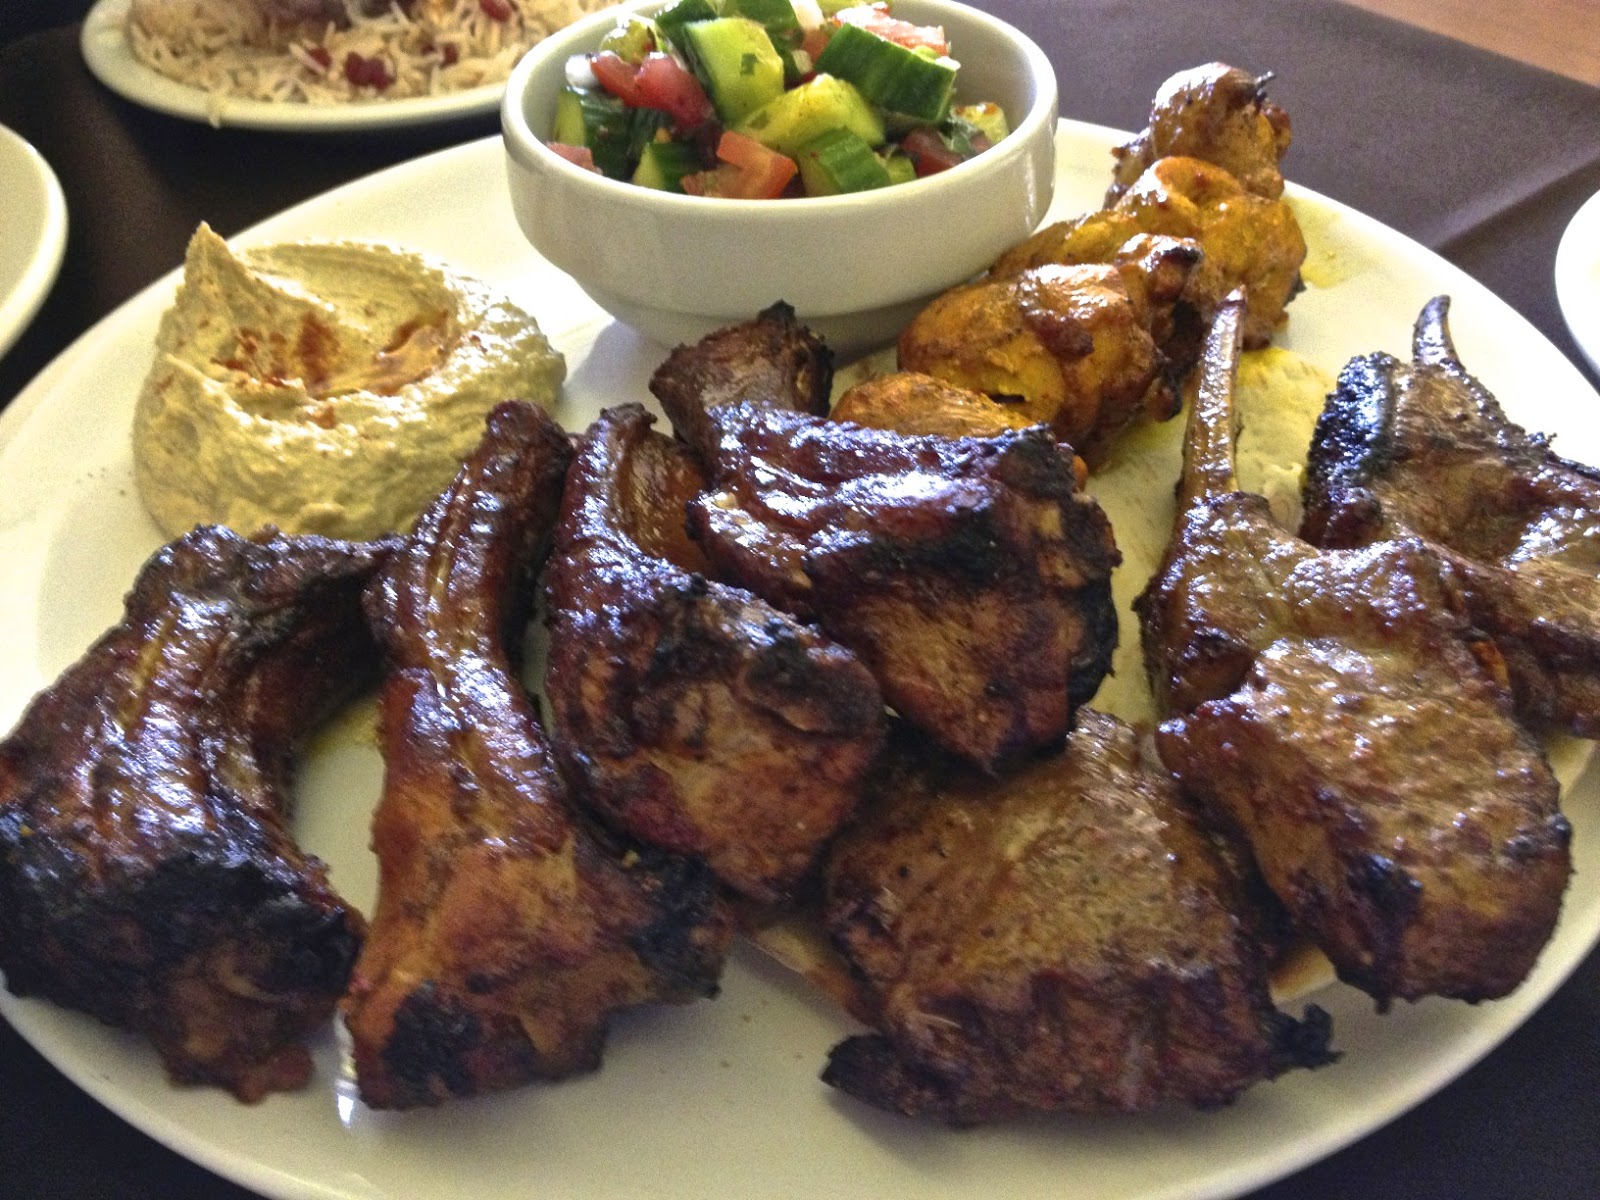
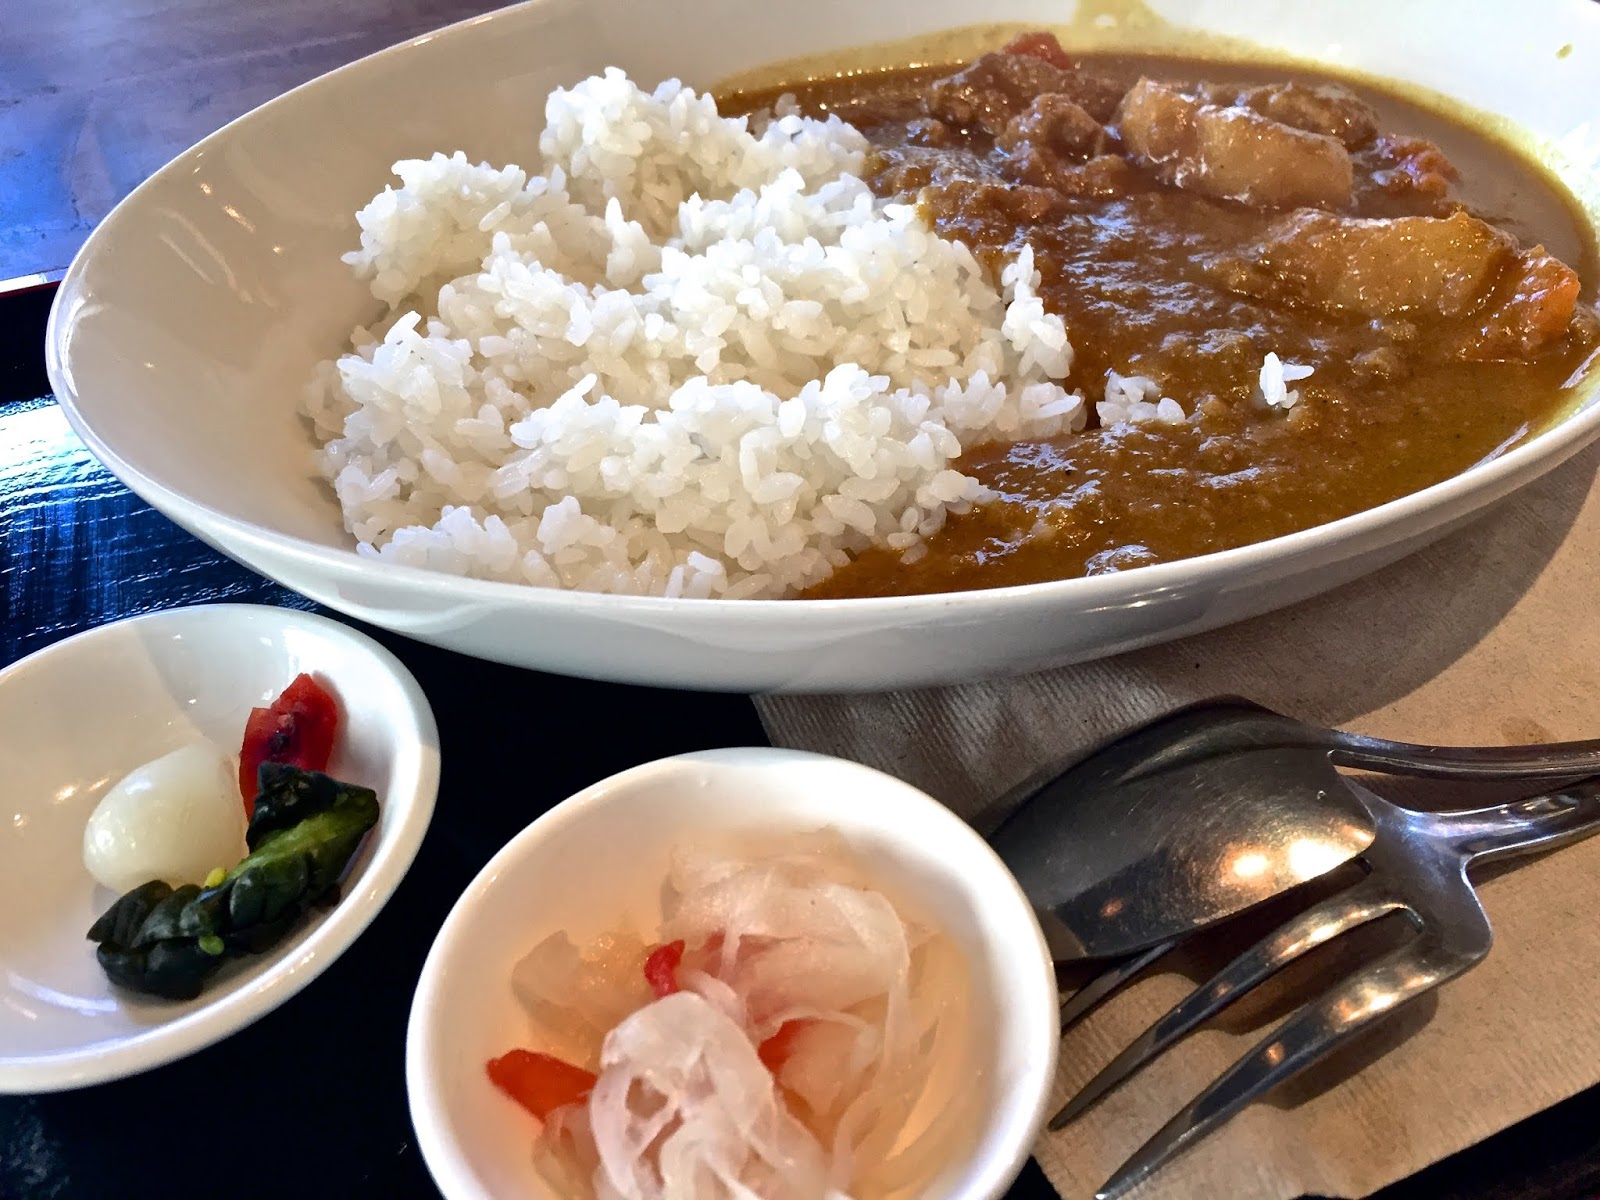
Goemon Curry - Japanese curry in Nolita
29 Kenmare Street (at Mott) west of Bowery, south of Houston, 212/226-1262, Cash only. Close to Subway J & Z (Bowery) or B & D (Grand)
Large portions of well made curry. The Yakuzen soup curry with chicken and vegetables and Mama's curry with chicken, potato, carrot and steamed rice are very good. 


Szechuan Mountain House 19-23 St Mark’s Place near Cooper’s Union and NYU, (917) 388-3866.
Upscale but affordable. You can order dishes as spicy or not as spicy as you like. It’s on the 2nd floor of a building that seems to be undergoing perpetual construction.


Located around the city. I go to the branch in the Hotel Chelsea, 220 W 23rd Street bt 7th & 8th
212/675-9100
Great cake donuts. 

Long Island City


Adda Indian Canteen is an amazingly good Indian restaurant that is easy to get to by subway, recommended by Barbara Chenitz who eats out as often as she attends theater. Babs is my go-to-person for both. She convinced me that Long Island City was easy to get to so we had a fabulous lunch at Adda Indian Canteen, 31-31 Thompson Avenue, Long Island City, NY 11101, 718/433-3888, @Addanyc, email: hello@addanyc.com


Tuesday, December 3, 2019

Los Angeles Restaurant Recommendations for a Friend who Lives in New York

Sometimes out of town friends ask for restaurant recommendations. The restaurants I love in Los Angeles are spread all over town and they usually aren't ones that are famous. 

I thought I'd share the list with you.

Adana Restaurant
6918 San Fernando Road, Glendale 91201 818/843-6237
Delicious food. Written about by me, Mark Bittman and Jonathan Gold. We all love it. The chef, Edward Khechemyan, is a hard working, inventive man. The food is freshly made. Affordable. Delicious.

Here are links to reviews:
http://www.nytimes.com/2013/07/28/magazine/this-armenian-life.html?_r=0
http://www.latimes.com/food/la-fo-0307-gold-adana-restaurant-20150307-story.html
http://menwholiketocook.blogspot.com/search/label/Adana%20Restaurant


Yabu 
11820 W. Pico Blvd
LA CA 90064
 (310) 473-9757
The best affordable sushi, tempura, udon and soba in LA. An intimate, cozy, friendly space. 

Here is my review:
http://menwholiketocook.blogspot.com/2011/08/yabu-in-west-los-angeles-authentic.html


La Fiesta Brava
259b Hampton Drive, Venice, CA 90291
310/399-8005, open 7 days a week 10:30am-9:00pm
A hole in the wall restaurant owned by a family. When I first visited in their original location on Rose Avenue, the restaurant was actually in a house that had been converted into a cafe. Their new location on Hampton Drive is more cafe-traditional, but this is as close as you’ll get to eating in a Mexican family’s home without going to a Mexican family’s home. The chicken mole is fantastic. Michelle loves the pepper shrimp in the shell with beans and rice. The fish taco is actually a whole grilled fish filet on a handmade tortilla topped with creamy salsa. The food is really good. 

http://menwholiketocook.blogspot.com/2014/09/la-fiesta-brava-delights-with-old.html


Sunday, November 24, 2019

Ready, Set, Go. Sharpen Your Knives for Thanksgiving and Holiday Entertaining

I enjoy cooking the most when I've taken the time to plan what I'm cooking. I made a recipe list and finished the shopping. The kitchen is cleared of clutter. The ingredients are organized and my knives are sharpened.

That preparation is most important when we're having a dinner party or a seasonal celebration. Right now, that means Thanksgiving.


In reviewing the recipes we want to use, we culled out ones that weren't as good last year as we hoped and searched for dishes that take us in new directions. We confirmed our standby favorites like roasted Brussel sprouts, cornbread stuffing with apricots and shiitake mushrooms, kosher and Moroccan style pickles, whole roasted tomatoes, made-from-scratch cranberry sauce and so many more.


We're organizing all the kitchen implements we need. Roasting pans, turkey baster, oven thermometer and, most importantly, that our knives are sharp.

A Good Knife is a Sharp Knife

If you enjoy cooking, you know the value of a good knife. There is nothing so unsatisfying as using dull knives to prepare a big meal like Thanksgiving dinner. The chopping and carving that should be a delight become a tedious, unhappy chore.


Over the years, I have put together a good collection of carbon stainless steel knives. I prefer Japanese style knives with their thiner blades and harder steel.

I have a filleting knife, a half dozen pairing knives, a serrated bread knife, utility knifes and several chefs knives. I also have a sushi knife for those occasions when I want to make thin slices of raw fish to serve on steamed rice or on a fresh green salad.


I want my knives with me wherever I am. Even when I travel, packed safely in my checked luggage, I always carry one of the pairing knives and a chef knife.

Cooking is one of the best ways to explore a destination if you have a kitchen where you are staying. Shopping puts you close to the local rhythms of life and cooking with fresh, local products is so much fun.

Or, if you are staying with friends, nothing says "thank you for letting me be a guest in your home" than making a meal for your hosts.

But a knife is only as good its edge. When you feel the knife drag as you slice a carrot or cut through a chicken breast, you know it's time to sharpen the blade.

For many years I used a steel rod, the kind butchers use to carve a thick pork chop or trim a rack of spareribs. But when the steel rod didn't give me the sharp edge I wanted, I switched to an electric knife sharpener. That made all the deference. Every couple of weeks, when I noticed that slicing a tomato wasn't as easy as it used to be, I'd run the knives through the sharpener and I'd be back in business.

I was perfectly happy with the knife sharpener I had, and then, I was asked to try the Work Sharp E5.

The Work Sharp E5 Electric Kitchen Knife Sharpener

When I used my old knife sharpener, my knives sharpened up nicely, but they didn't hold their edge. Now that I've been using the E5, I find my knives are sharper than before and they hold their edge longer.


Created by Work Sharp Culinary, the E5, its sister the E3 and the newest and most economical the E2-S sharpen every type of kitchen knife.

The more expensive E5 sharpens as well as the E3 with the added advantage of timed sharpening. Draw the knife through the sharpening slot, once, twice or as many times as necessary. The machine can sense when the edge is sharp and turns off.


To finish the sharpening processes, both the E3 and E5 come with a ceramic honing rod for fine tuning your blades. The E5 honing rod has an ingenious addition. On the side of the handle, a v-shaped notch is actually a MicoForge, designed to clean up the edge of your knife blade, extending its sharpness and giving you more control when you are slicing.


The E3 and E5 will also sharpen blades that are sharp on only one side like serrated bread knives, scissors, kitchen shears and my Japanese sushi knife.

Unlike my old sharpener which relies on factory installed disks to straighten and sharpen. The E3 and E5 use replaceable belts of varying grades (extra coarse, coarse, medium and fine). Color coded, they are easily replaced by flipping open the front panel and threading around three rollers. The belts slide off and on with ease.

The 17° guide that comes with the E3 and E5 works well with both East and West style knives. For a finer edge, I was given an Upgrade Kit which includes 15° (East) and 20° (West) guides and an expanded selection of belts.

Since my knives are mostly made in Japan, I switched out the 17° for the 15° guide. I'll be interested to see if I notice a difference in time.

Right now I'm seeing a big improvement in the sharpness of my knives.  Of course, the true test will be Thanksgiving, when all hands and all knives will be pressed into action to bring the half a dozen salads, dozen side dishes and a carved turkey to the table.

Friday, November 8, 2019

Ready, Set, Prep: Planning Makes Thanksgiving a Lot More Fun

Thanksgiving was my mother's favorite holiday. She loved the food, the gathering of friends and family and the positive outlook of a holiday that sought to bring everyone to the table. My wife and I enjoy having a gathering at our house as a time to celebrate what is good about our life, to see family and friends we don't see often enough and to have a really great feast.

Because we host the meal at our house, there is a lot to do.


Whether you are hosting a dinner of six or twenty-six, with so many dishes part of the celebration, planning is essential. And that means being prepared. Planning ahead ultimately means less stress and more fun on Thanksgiving. 

The First Step - Make a List 

Step 1 - as soon as you decide you will host, invite the guests so you have a head-count and ask who will bring a favorite Thanksgiving dish

Step 2 - pull out the recipes you want to make, make an ingredients list and a preparation time line (some dishes like pickles can be made the week before, some like an apple pie and the turkey are best made on Thanksgiving)

Step 3 - clean the house

Step 4 - borrow extra chairs

Step 5 - pull the extra table out of the garage

Step 6 - shop

Step 7 - cook

Step 8 - eat

Step 9 - clean up

Step 10 - lie down

The recipes we use are a mix of the ones we've perfected over the years and a couple that are new to us. We want to have the favorites and also to shake it up a bit, to have some surprises.

Among the favorites are kosher dill pickles, corn bread stuffing with Italian sausage and shiitake mushrooms, cranberry sauce with nuts and orange juice, shiitake mushroom-turkey liver pate and chocolate banana walnut cake.

I've already made the Moroccan style pickles that I learned to make on a trip to Marrakech. The kosher dill pickles only need 2-3 days to cure, so I'll make those on Monday of Thanksgiving week.

10 Delicious Holiday Recipes

To help prepare for Thanksgiving, I published an e-cookbook 10 Delicious Holiday Recipes.
The ten recipes are easy-to-make, festive and fun. With a recipe for roasting a perfect Thanksgiving turkey with stuffing.

Using the Kindle App you can read the recipes on any smart phone, computer or tablet. The app is free and downloads easily.

I hope you'll buy my book and let me help you plan your holiday meals with recipes for special cocktails, appetizers, salads, sides, entrees and really delicious desserts.

Friday, October 25, 2019

Ready, Set, Brine - Making Pickles for Thanksgiving and Anytime

Thanksgiving is a month away. Now is a good time to send out invitations, assemble favorite recipes and make pickles.

Pickles are delicious anytime of the year. For Thanksgiving they are especially good. Their crunch and acidity counterbalances the deliciousness of gravy, mashed potatoes and roast turkey. 

For Thanksgiving I always make two kinds of pickles. Kosher dill pickles and Moroccan-style pickled vegetables. Kosher dills should be made a few days before served. Moroccan-style pickled vegetables should be made two weeks ahead. They will keep, sealed in a jar, refrigerated for as long as a year.


No doubt the people who made the first pickles thought they had made a mistake. Somebody accidentally forgot about some raw vegetables in a pot with an acid and salt. Surprise, surprise. A week later, the vegetables weren’t moldy, no bugs had eaten them and, deliciously, they had a nice crunch and tang. Thus was born, the pickle!

In the 1920s, my great-grandfather made pickles on the Lower East Side of Manhattan. Grandmother Caroline used to tell stories about working in their little grocery store as a child. When customers would want pickles, she would hop off the counter and go out front to the pickle barrels and fish out the ones they wanted.

I never knew her parents. I never ate their pickles, but I must have brine in my veins because wherever I travel, I am always on the look out for pickles.

Moroccan pickled veggies

In Morocco at a cooking class in Marrakech at La Maison Arabe, Amaggie Wafa and Ayada Benijei taught us to make Berber bread, couscous with chicken and vegetables, chicken tagine with preserved lemons and clarified butter, tomato marmalade, eggplant-tomato salad and preserved vegetables.
The cooking class lasted four hours. The time it took to show us how to make preserved or pickled vegetables: five minutes.
To Wafa and Benijei, the process was so easy, there were no pickle recipes. A little of this, a little of that, throw the vegetables into a jar, shake it up, put it in a cupboard and in a week, voila, you have pickles.

Pickle recipes tip from Grandma

From my grandmother I learned that making kosher dill pickles was a little more complicated. In retrospect, I think that’s because pickling cukes are more prone to decay than are the carrots, parsnip, fennel and green beans used in Morocco.
Every Thanksgiving I make both.
Pickles are very personal. What one person loves might be too salty or vinegary to another. It may take you several tries before you settle on the mix of salt, vinegar and spices that suits your palate.

Garlic is usually added to brine. My grandmother didn't put garlic in hers and I don't put any in mine so I indicated garlic as optional.

Lower East Side Kosher Dill Pickles

When making kosher dill pickles keep in mind four very important steps:
1. Select pickling cukes, not salad cucumbers, and pick ones without blemishes or soft spots.
2. Taste the brine to confirm you like the balance of salt-to-vinegar. The flavor of the brine will approximate the flavor of the pickles.
3. Once the cukes are in the brine, they must be kept submerged in an open container.
4. When the pickles have achieved the degree of pickling you like, which could take three days to a week, store the pickles in the brine, seal and keep in a refrigerator where they will last for several weeks.
Ingredients
8 cups water
¼ cup kosher salt
1 cup white wine vinegar or yellow Iranian vinegar (my preference)
4 garlic cloves, skin removed, root end trimmed off, cut into thin strips (optional)
5 dried bay leaves
10 whole black peppercorns
10 whole mustard seeds
¼ teaspoon pepper flakes or 1 dried Sichuan pepper, split open
5 sprigs of fresh dill
5 pounds small pickling cucumbers, washed, stems removed, dried
Directions
1. In a non-reactive pot, heat the water and vinegar on a medium flame. When the water gently simmers, add the salt and stir to dissolve. Do not allow the water to boil.
2. Dip your finger in the brine, taste and adjust the flavor with a bit more salt, water or vinegar.
3. Place the garlic and spices in the bottom of a gallon glass or plastic container. Arrange the cucumbers inside.
4. Pour in the hot brine being careful to cover the cucumbers. Reserve 1 cup of brine.
5. To keep the cucumbers submerged in the brine, find a plastic cup that is not as wide as the mouth of the container. Place the reserved cup of brine into the plastic cup and put into the container to press down on the cucumbers.
6. Place the container in a dark, cool corner of the kitchen. Check daily to make sure the cucumbers are submerged. If the brine evaporates, use the reserved brine in the plastic cup, replenishing the liquid in the cup with water to weigh down the cukes.
7. After three days, remove one cucumber and sample. If you like your pickles crisp, that may be enough time. If they aren’t pickled enough for you, let them stay on the counter another few days.
8. When you like how they taste, remove the cup and seal the top. Refrigerate the container.

Moroccan Style Preserved Vegetables

In Morocco, virtually any vegetable can be preserved. In the class, we were shown green beans, fennel, parsnips and carrots. Experiment and see what you like, including asparagus, zucchini, beets, daikon, eggplant, daikon and broccoli.


For myself, over the years I have settled on onions, carrots, cauliflower florets and green cabbage. Recently I have been making celery hearts because every morning my wife juices a celery stalk to begin her day with a glass of healthy celery juice. That  makes me the beneficiary of a great many celery stalks, which I am making into pickles. Which I love.
Whatever you try, prepare the vegetable by washing, peeling and cutting them into pieces similar in size, about a 1/4" except with the celery hearts. I leave the bottom of the hearts so they pickle as a stalk.
The fun thing about pickling is you can personalize your pickles, making them any way you like.

Save the pickling brine. It is delicious poured over warm Japanese rice or mixed with olive oil to make a salad dressing.
Ingredients
2 whole carrots, ends trimmed, washed, peeled, cut into rounds, ¼-inch thick

2 celery hearts, root end trimmed

1 medium yellow onion, washed, root and stem ends removed, peeled, sliced lengthwise (root to stem) 1/4" slices
1 small whole green cabbage, washed, any brown outer leaves removed and discarded, cut in half, cut out core and reserve for soup, cut into 1/4" squares

1 small white cauliflower, washed, leaves removed (instructions below)
4 bay leaves
½ teaspoon black peppercorns
¼ teaspoon pepper flakes or 1 dried Sichuan pepper, split open, roughly chopped
1 teaspoon dried oregano
1 garlic clove, skin removed, root end trimmed off, cut into thin strips (optional)
3 tablespoons kosher salt
1½ cups white wine or yellow Iranian vinegar
2 cups water
1 tablespoon olive oil
Directions
1. Sterilize two quart-sized glass or plastic containers.

2. Finalize the prep on the cauliflower by using a sharp pairing knife to create 1" long florets about 1/4" thick. Use the remaining stems for a stir fry or soup.


3. Toss the vegetables together to mix well in a large bowl.

4. Place the mixed vegetables into the two jars.

5. Add equal amounts of the aromatics to each jar.
6. Combine the kosher salt, water and vinegar. Mix well. Taste. If you find the mixture too acidic, slowly add water until you like the flavor. If not salty enough, add a small amount of kosher salt
7. Pour the water-vinegar mixture into the jars, making sure the liquid covers the vegetables. If more liquid is needed, make more brine and reserve any left over.

8. Top off each jar with equal amounts of olive oil.
9. Seal the jars and shake well to dissolve the salt and mix the aromatics.
10. Refrigerate. Wait one week and taste. Wait longer if they aren’t pickled enough. They will keep in the refrigerator for months.


Saturday, September 21, 2019

Ready. Set. Go. "00" Flour Makes the Best Homemade Pasta

When I learned how to make pasta from scratch, I gave away all my boxes of dried pasta. Quality brands of spaghetti, linguini, fusilli, penne, tagliatelle and pappardelle. All of it.

I also gave away my shiny chrome Marcato hand-operated pasta making machine.

Now I only wanted to eat pasta that I made myself.  No machines. Just me, a rolling pin, an egg and "00" flour.

I always loved pasta, even when my mom served me Chef Boyardee's pasta and sauce in a can. As an adult, I made my own sauces and used dried pastas, priding myself on buying the best quality available.

On a press trip to Seattle, I had a pasta-epiphany at Spinasse (1531 14th Avenue, Seattle 98122, 206/251-7673). I was traveling with a group of food writers. Before the pasta arrived, we were talking nosily about the trip. One taste of our pasta and all talking ceased. Everyone focused on their plates. I had pasta with a deliciously savory meat ragu (Tajarin al ragu). 

That pasta was a revelation. The bite, flavor and texture of chef Stuart Lane's pasta was unique in my experience. After that visit, I wanted to make my own pasta at home. I bought a machine and read countless recipes. The result was always less than satisfying.

Ultimately I gave up on making my own pasta and concentrated on sauces


Then I watched the "Fat" episode of Samin Nosrat's Netflix series Salt Fat Acid Heat. That episode is my favorite of the series. I loved watching chef Nostrat lose herself in the sights, sounds, textures and ingredients of Italy.

In the episode she visits Benedetta Vitali's Tuscan kitchen to learn her way of making pasta. The instruction was simple. Mix together the best eggs and "00" flour you can find. Knead and roll out the dough into a paper-thin, round sheet. Use a knife to cut the pasta. Boil in salted water. Drain. Done!

As soon as the episode ended, I had to try. Since I didn't have "00" flour, I used All-Purpose flour. The result was good and, thinking "00" flour was too exotic to find locally, I kept using AP flour, but the result was inconsistent. 


So I went in search of "00" flour. Which wasn't much of a search. Our local supermarket carried it. A bit more expensive than AP flour, "00" made all the difference.

I was so excited by the result, now I make pasta all the time.

Basic Pasta Dough

In correspondence with chef Lane for this post, he explained that "'00' is "a fine grained/milled slightly softer than all purposed flour."  That finer grain gives the dough better elasticity. 

To prevent the dough from sticking while you roll it out, sprinkle flour on the surface of the cutting board and on the dough. When pastry chef Federico Fernandez was showing me how to make sfogletella, a wonderful Italian pastry, for my YouTube Channel: Secrets of Restaurant Chefs, he used semolina instead of flour on the cutting board. 

I liked the idea of using the coarser semolina when I make pasta. I dust the cutting board with semolina, which is incorporated into the dough. I think it adds a nice texture. Less available than "00" flour, both are sold in Italian markets. (For a good description of the differences between "00" flour and semolina, please visit the website Farro.)


As with any dish, using the best ingredients improves the quality, so use the best eggs you can find. Chef Lane sources his from organic farms in the Seattle area like Stokesberry.

One day after I had rolled out the dough, I was distracted by a phone call. Before I realized it, more than half an hour had passed. When I returned to the kitchen, I discovered that the dough had dried slightly. The pasta that day was lighter, with a better bite. I added the air-drying step to my pasta making. I was very pleased when chef Lane noted that letting his dough dry was a key step for him as well.

Because the dough is fresh, the pasta cooks more quickly than dried pasta. On average, 5 minutes is sufficient, but taste the pasta after 3 minutes so it doesn't over cook.

I add freshly ground pepper and sea salt to the flour for added flavor, but that is optional.

When the pasta cooks in the salted water, it expands. What appears to be a small amount of dough on the cutting board will yield a much larger amount of cooked pasta.

To make larger yields, multiple the ingredients by the number of servings you want. However, for ease when rolling out the dough, I would advise working with an amount of dough equivalent to that made with 1 egg and 1/2 cup of flour.

The dough must be used the same day you make it. Once cooked, the pasta can be kept in an air-tight container to use the next day.

Prep time: 15 minutes

Waiting time: 45 minutes

Cook time: 5 minutes

Total time: 65 minutes

Yield: one entrée serving or two side dish servings

Ingredients

1 farm fresh egg

1/2 cup "00" flour + 2 tablespoons "00" flour or semolina to dust the cutting board and dough

1/8 teaspoon freshly ground black pepper (optional)

1/4 teaspoon sea salt (optional)

1 tablespoon kosher salt

Directions

1. Place the flour on the cutting board. Using a fork, make an indentation into the top of the mound to create a "volcano." Season flour with black pepper and sea salt (optional)


2. Remove the egg from its shell and place into the indentation.

3. Using the fork, swirl the egg into the flour until completely incorporated. Use the fork to scrape the wet dough off the cutting the dough.


4. Dust the wet dough with flour or semolina. Clean any dough off the fork. Use your hands to form the dough into a ball. Liberally sprinkling flour or semolina on the cutting board, roll the dough back and forth. Incorporate any dough that sticks to your fingers or the cutting board. Continue rolling the ball back and forth on the cutting board for 10-15 minutes. As chef Lane notes, "Really knead the dough a lot. You are not going to overwork it (like bread). In fact, it is more common to underwork it."

5. Wrap the dough in plastic wrap and allow to rest 30 minutes. If the weather is cool, leave the dough on the counter. If the weather is hot, place the dough in the refrigerator.


6. Unwrap the dough. Sprinkle flour or semolina on the cutting board. Using a rolling pin, flatten the dough and roll out, keeping the round shape by turning the disk of dough frequently. After rolling out the dough three or four times, flip it over, dusting the cutting board and the dough to prevent sticking. Continue rolling out the dough until it is paper thin.


7. Allow the rolled out dough to air-dry for 15-30 minutes.

8. Add kosher salt to water in a large stock pot. Bring to a boil.

9. Place a colander and a heat-proof cup in the sink.

10. Sharpen a chefs knife.

11. Lightly dust the rolled out, air-dried dough with flour or semolina, fold the circle of dough in half. Do not press the dough.


Dust again and fold a second time.


Dust again and fold a third time and then a fourth time until the folded dough is approximately 1" wide.


12. You can cut the pasta into any width you enjoy, remembering that the pasta will double in size in the boiling salted water.


13. After you have cut the dough into strips, lift the cut pasta and let fall onto the cutting board so the strands separate.

14. Place into the boiling salted water, using tongs to separate the strands. Cook 3-5 minutes. Taste after 3 minutes to confirm when the pasta is to your liking.


15. Drain in the colander, capturing 1 cup of salted pasta water in the heat-proof cup to use in making a pasta sauce.

16. Toss in the colander so the strands do not stick together and serve while hot.