Inspired by California-Mediterranean cuisines and farmers markets, I cook healthy, flavorful dishes that are easy-to-prepare yet elegant. I write for Zester Daily, One for the Table, Luxury Travel Magazine, Huffington Post & New York Daily News. My latest Amazon eCookbook is 10 Delicious Holiday Recipes. My handcrafted chocolates are available at www.dchocolates.com.
"Subscribe via email" and you'll get an email whenever I post a new recipe.
The 4th is a time to celebrate our families and communities, to embrace what is good about our lives and to celebrate our hope for the future. We will join friends for a BBQ and a drone-light show. Definitely no fireworks in Pacific Palisades where we suffered so bitterly in the January 7th blaze that took so many of our homes.
That was then, July 4th is now. We are moving forward and rebuilding what was good in our lives. Our contribution will be chicken wings, potato salad and easy-to-make beets.
I prefer very large beets that are sweeter than the small ones preferred in restaurants. If you find beets with their greens on, definitely cut off the leaves and stems and sauté them in olive oil with onions and seasoned with sea salt and black pepper. Sautéed beet greens are delicious as a side dish to go with BBQ steaks and chicken and also tossed with pasta.
ROASTED BEETA
Serves 4
Time to prep: 1 minute
Time to cook: 60-90 minutes (depending on the size of the beets and your oven)
Time to prepare: 5 minutes
Ingredients
1 large beet or 2 medium sized beets, washed, stems and leaves removed and sautéed as described above
Olive oil, to taste
Sea salt and black pepper, to taste
Directions
Preheat oven to 500 F.
Place beet or beets on a wire rack on a cookie sheet or piece of aluminum foil.
Place in oven and roast until a pairing knife passes easily into the beet
Cool and use a pairing knife to remove the blacked skin and ends.
Serve sliced, julienned or diced as a salad seasoned with olive oil, sea salt and black pepper.
Options
Add crumbled feta cheese and toss to mix well.
Add diced roasted beets to green salad with tomatoes, celery leaves, arugula and olives. Season with olive oil, sea salt and freshly ground black pepper.
Add pomegranate seeds and season with olive oil, sea salt and freshly ground black pepper.
Getting ready to travel to Italy next week, I remembered my last trip three years ago, a few weeks before the world changed and my overseas travel was limited to webinars and Instagram posts. In the fall of 2019, I visited Piedmont and Milan.
Walking one day in the courtyard of the Duomo, that wonderful cathedral in the heart of Milan, and the next day descending hand chiseled stairs that led down to an Infernot where farmers stored produce and later wine.
Before the discovery of the New World, Italian farmers in the Piedmont were digging deep into the sandstone underneath their homes in their own exploration of discovery, building rooms where men gathered to eat, talk and drink wine. All they lacked was air. Without a ventilation system, once the air was used up, the men rushed up those hand chiseled stairs before they passed out.
On that trip, I ate local cheeses, charcuterie, bagna cauda (an anchovy-garlic dip), spaghetti with clams, and so many dishes that made me very happy. When travel was not possible, I satisfied my "hunger" for all things Italian by cooking foods that reminded me of Italy. Last night I made pasta with Italian sausage, butter clams, vegetables and a touch of sweet butter.
For my wife, who doesn't eat meat, I used a Chinese clay pot to make braised tofu with vegetables, the Spanish spice pimeton and San Marzano tomatoes D.O.P. That brought together China, Spain and Italy in a one pot dish.
Hot Pot Braised Tofu with San Marzano Tomatoes, Vegetables, Olives and Noodles
The cans of San Marzano Tomatoes I was gifted (see at the end, below) had enough tomatoes and sauce for several dishes. What I didn't originally use, separating sauce from tomatoes, I froze in 6 oz and 8 oz containers. Because our sons are fully grown, I cook for two. Whenever I have too much of an ingredient, I place small containers in the freezer, available when I want to create a dinner or lunch.
The San Marzano Tomatoes and sauce froze and reheated with no loss of flavor.
Clay hot pots are available in Asian markets. Inexpensive, they require a bit of special care. Before using, each time, submerge the clay pot into clean water for 15 minutes. Purchase a wire trivet that you'll place on the stove-top burner. The clay pot goes on top of the wire trivet. Only use a low to medium flame to avoid stressing the clay. Allow the pot to cool before washing to avoid cracking.
If you can find only small clay pots, use two to prepare this dish.
Serves 4
Time to prepare 15 minutes
Time to cook 45 minutes
Total time: 60 minutes
Ingredients
1 cup yellow onions, washed, peeled, roughly chopped
1 cup carrots, washed, ends removed, peeled, roughly chopped
1 cup daikon, washed, ends removed, peeled, roughly chopped
1/2 cup corn kernels, cut off the cob (when available)
1 cup broccolini or broccoli, stems roughly chopped, leaves whole and florets sliced into bite sized pieces
2 cups tofu, preferably firm and organic, washed, cut into bite sized pieces
1 cup San Marzano tomatoes D.O.P., roughly chopped
1/2 cup San Marzano tomato sauce, D.O.P.
2 cups homemade vegetable stock, if none available, use water
1 cup green or black olives, preferably olives with pits
1 pound noodles, dried or fresh
1/2 tablespoon pimeton
Sea salt and freshly ground black pepper to taste
Directions
Heat olive oil in hot pot over medium heat.
Saute onions.
Add tofu and stir well.
Add pimeton and stir well. Don't burn the spice.
Add carrots, daikon and corn. Stir after each ingredient is added.
Add broccolini or broccoli stems. Stir well and cook to soften.
Add broccoli or broccoli leaves. Sir well.
Add chopped tomatoes and tomato sauce, if frozen, no need to defrost.
Add vegetable stock, if frozen, no need to defrost. If stock unavailable, use water.
Add olives, cover and simmer 30 minutes.
While the tofu is braising, bring a pot of salted water to boil and cook noodles according to the package. 10 minutes if dried, 2-3 minutes if fresh. Drain and set aside.
Remove cover and add cooked noodles.
Stir well to mix together tofu, vegetables and noodles.
Serve hot in bowls.
Please send me recipes and photographs when you make your delicious dishes using Pomodoro San Marzano Dell'Agro Sarmese-Nocerino D.O.P. and I will submit your recipe to enter a contest to win a gift basket of these wonderful D.O.P. San Marzano tomatoes.
The tomatoes I used were provided courtesy of the Consorzio di Tutela del Pomodoro San Marzano dell’Agro Sarnese-Nocerino DOP and ANICAV.
A bone-in steak seared medium-rare in a carbon steel pan
A baked potato with sour cream and scallions
An egg salad sandwich flavored with dill on crustless Japanese white bread
And, my favorite, congee.
Necessity led to a favorite dish
I couldn't sleep one night. Too much stress, too much going on in the world to sleep through the night. I woke up at 4 am and couldn't go back to sleep. Better to get out of bed so I wouldn't disturb my wife. Walking into the kitchen, I opened the refrigerator, hoping to find something already made or a dish that would be easy to prepare.
I needed comfort food.
In the dull light, I saw there wasn't much. Wednesday was market day. This was Monday.
Searching in the refrigerator, I found a container of homemade vegetable stock I had made the day before, Japanese white rice from a take-out dinner two nights ago, a carrot, a shallot, an ear of corn, fresh shiitake mushrooms, green beans and a small piece of daikon.
That didn't sound like a treasure-trove, but those ingredients sparked an idea that led to my enjoying a deliciously comforting meal just as the sun was coming up.
Sautéed vegetables. A liquid. Cooked rice. That's all I needed to make congee.
What is congee?
Visit most Chinese restaurants and you'll find a section of the menu labeled "Congee. The basic components are raw white rice and a liquid. The rice is simmered for up to an hour in the liquid, which can be water or stock made from seafood, poultry, beef or pork.
The result is a porridge-like bowl of creamy rice. Depending on the restaurant, the congee can be flavored with bits of protein or vegetables and topped with fresh scallions, fried shallots and a drizzle of hot oil.
Inspired by traditional congee, my version is very different
I use cooked rice added at the very end so my "congee" isn't creamy. Depending on my mood, I may add a great deal of vegetables and a protein and a smaller amount of rice. Purists might say I am making soup with rice, but in my telling of the tale, I add a lot more rice than you would find in 'soup with rice.'
With my approach, the results are infinitely variable. The only constants are cooked rice and a liquid.
Another variable is the ratio of broth to rice. For dry, cook the rice in the soup until most of the liquid is gone. For wet, cook the rice very briefly in the soup. Sometimes I like the congee with practically no broth. On a cold morning, lots of soup with the rice is the way to go.
The rice
You can make congee out of any kind of cooked rice.
Most of the time, I use Japanese short grained white rice or Chinese long grained rice. But, Thai brown rice, Middle Eastern basmati rice or Vietnamese broken white rice would also work. I have even used basmati rice flavored with almonds and orange peel from my favorite Armenian restaurant, Adana (6918 San Fernando Road, Glendale 91201, 818/843-6237).
Each rice creates a different result. The cooking time, amount of liquid used and the end result will change depending on the rice.
Cooking tip: if the cooked rice you find in the back of the refrigerator has dried out, no worries. Cooking the rice in a liquid will reconstitute the grains. If you see mold, toss the rice.
Generally speaking, one cup of cooked rice will serve one person. The ratio of rice to proteins and vegetables is a matter of personal taste.
The stock
I always use homemade stock. To make vegetable stock, during the week I freeze vegetable peelings. On the weekend, I add them to a pot of boiling water, simmer 60 minutes, strain and, voila, homemade vegetable stock. Whenever we make a chicken dish, I save the bones, fat and skin, cover with water, simmer 60 minutes, strain and cool. The resulting vegetable or chicken stock can be refrigerated or frozen in an air tight container.
In a pinch, sautéing a goodly amount of vegetables and adding water will pull out flavors from the vegetables. That creates enough homemade stock for your congee.
Homemade stock will produce the healthiest, freshest flavors. Store bought stock whether fresh in the deli department, packaged in cans or boxes or even dehydrated can be used, but the salt content tends to be high and the quality unpredictable.
I have used all kinds of broth. Sometimes I'll use the miso soup I brought home from a Japanese restaurant or I'll make stock by boiling left-over Thai bbq honey pork ribs or turkey stock from a Thanksgiving feast or chicken stock made with the bones from a roast chicken.
Making your own stock means you control the quality and flavor, so I recommend keeping 16 and 8 ounce containers of frozen stock in the freezer so you are always prepared to make a delicious savory meal at a moment's notice.
And, as I mentioned above, in a pinch, use water added to the sautéed vegetables to create a spur of the moment stock.
Vegetables and proteins
Use fresh vegetables or left-overs. Roasted vegetables from last night's dinner or bok choy and broccoli from Chinese take-out can be chopped into bite sized pieces and added to the congee. My go-to base ingredients are fresh, chopped onions, carrots, kale, shiitake mushrooms, green beans, daikon, broccoli stems or crowns and Savoy cabbage leaves, if I have them and corn kernels when in season.
For a protein, tofu, chicken, pork, fish and shellfish are good to add. Use cooked or raw proteins, knowing that the cooking times will be different for each. Cooked proteins only need to be reheated. Raw proteins can take longer, although fish and shellfish cook very quickly. Tofu can be added along with the stock.
Vegan or omnivore
Use ingredients you like. Stick with plant-based and make a best-ever vegan congee with homemade vegetable stock, rice of your choice and all the vegetables that make you happy.
If you're an omnivore, just about any animal protein or seafood works well. Use any protein you enjoy. Cooked meats with a lot of flavor, like bbq brisket or Vietnamese bbq pork or roasted dark chicken meat will add layers of flavor. Raw pieces of fish filets, crab, shrimp or lobster, add flavor to the broth as they cook.
Congee with Scallions and BBQ Pork
As with all cooking, if you use quality ingredients, the resulting dish will taste better and be healthier.
Every element added to the congee should build to a final, layered conclusion. You can keep the result simple, like a piano recital, emphasizing the "quiet" of the stock and the rice or jazz it up with a composition with rhythms of hot, sour, sweet and savory.
I often add bbq pork from my frequent trips to Little Saigon south of LAX. From my home, the drive takes under an hour, barely enough time to catch up on The Daily, one of my favorite podcasts. On the return trip, I listen to the news and happily eat aBánh mi from Bánh Mì Saigon ( 8940 Westminster Blvd., Westminster, CA 92683, (714) 896-8782) next to My Thuan, a favorite supermarket.
Cut all ingredients into small bite-sized pieces, the easier to pick up with chop sticks.
The recipe is for one, so multiply the ingredients by the number of servings you are making.
Serves 1
Time to prepare: 20 minutes
Ingredients
2 tablespoons yellow onions or shallots, cut into thin slices
2 tablespoons carrots cut into rounds or small "sticks"
2 shiitake mushrooms, washed, stem trimmed, cut into thin slices
1/4 cup broccoli, florets cut apart (optional)
1 tablespoon corn kernels (when available)
1/4 cup green beans, washed, cut into 1" sections (optional)
1 scallion, washed, root end removed, cut into 1/4" pieces
1 cup cooked rice
2 cups stock, preferably homemade
1/2 cup bbq pork or cooked beef, pork or chicken or raw shellfish or fish, cut into bite-sized pieces
1 teaspoon soy sauce (optional)
1 teaspoon Vietnamese sweet and hot sauce often served with bbq pork vermicelli (optional)
Sea salt to taste
Freshly ground black pepper to taste
1 teaspoon olive oil
Directions
Organize all the ingredients before beginning.
Heat small saucepan over medium flame. Add olive oil. Soften but do not brown. Add remaining vegetables, stir and soften.
If using cooked proteins, add and sauté briefly, then add stock. If using raw seafood, add to the broth.
Simmer 5 minutes.
Add rice. Break apart any grains that are stuck together. Stir well.
Simmer 5 minutes.
Pour into a large bowl. Top with scallions. Serve with chop sticks and a spoon. Serve hot and eat before the rice absorbs all the liquid.
A few years ago I convinced a chef to teach me how he made crispy skin on a filet of fish. chef Taylor Boudreaux said it was easy. I couldn't believe that. For years I had tried to cook a filet of fish with the skin on and the result wasn't good. Either the skin was chewy or burnt to a crisp.
When I ate Boudreaux's salmon filet with mushrooms, the charred skin was crisp as a slice of perfectly cooked bacon. A perfect contrast to the moist, sweet flesh.
He reveals the secret in the video. A carbon steel pan. That's it. The pan takes an incredible amount of heat. Up to 700F. The skin sizzles and in seconds is perfectly seared. A quick flip to char the flesh and then into a 350F oven to cook the filet on the inside.
After I bought a pan and seasoned it and used it successfully on a fish filet, I discovered the pan's other advantage. Easy clean up. Very much like a cut-down wok, the pan needs only a quick cleaning with a soapy sponge to remove the left-over oil, heated again on the stove top to burn off the water and that's it. No strenuously scrubbing to clean the pan the way I had done for years with the stainless steel pans I relied upon. Just a quick clean up and I was done.
A cast iron pan also works well at high heat, but from my experience the carbon steel pan does a better job. Both pans are relatively inexpensive. A carbon steel pan will cost half the price of a comparably sized, quality stainless steel pan. When you shop for a carbon steel pan, buy one that is made with a thicker gauge steel. I have been using de Buyer pans. Chef Boudreaux recommends Matfer Bourgeat. The advantage of the thicker gauge pans is they retain heat longer than the pans made with a thinner steel.
Cast iron pans are easy to find. Carbon steel pans, not as much. In the Los Angeles area, the only source for the pans is Surfas Culinary District. In New York, I have seen them upstairs at Zabar's.
Recently, I have seen a great many De Buyer pans on Amazon. I recommend looking there. Given the variety of De Buyer pans, I recommend the frying pans, not the pans with higher, rounded sides and frying pans with smooth bottoms. The ribbed bottoms are excellent to create grill marks, but the ribs inhibit good sautéing.
Using the pan exclusively, I discovered the beautiful work it does on steaks.
Treated very much in the same way as the fish filets, each side of the dry seasoned steak is charred and, if the steak is more than 1" thick, then placed into a 350F oven to cook the interior of the steak for five minutes. While the steak is resting for five minutes under aluminum foil, quickly sear your favorite vegetables in the pan to pick up the pan dripping flavor and serve as a side dish.
After that, I moved on to tofu, shrimp, octopus and chicken breasts. And then onto vegetables. Broccoli, shiitake mushrooms, Japanese eggplant, carrots, asparagus, green beans, English peas and corn kernels. Every firm fleshed vegetable I tried worked perfectly when I applied high heat using the carbon steel pan.
Valentine's Day always made me nervous. That discomfort began in middle school when we were given sugar hearts with little sayings that we were supposed to give to one another. "Love You." "Cutie." "My Valentine." Fearful of rejection, I didn't give out many hearts. In time, as my confidence grew, candy hearts gave way to fresh flowers and picking romantic restaurants. But I was still nervous.
I embraced Valentine's Day when I learned to cook. By preparing a meal, I could create artful dishes with exciting flavors. By preparing a meal, I could show I cared.
A special meal for a special evening
Google Valentine's Day dishes and the many recipes that pop up for this evening of romance emphasize richly extravagant ingredients or over-the-top sweetness. Kobe steaks with buttery sauces. Truffle rich lobster mac n'cheese. Double-dipped chocolate strawberries. Flourless chocolate cakes dusted with candied pistachios.
All those are great. But heavy. I prefer healthy and full of flavor.
That's where the Korean spicy condiment gochujang comes in. A little bit of spice goes a long way to brighten flavors and stimulate conversation. All chefs know that a few grains of cayenne adds sparkle to any dish. Gochujang does that and more. If pepper sauce can be said to have umami, gochujang has plenty of umami.
A mix of peppers, rice and sugar, gochujang gets its unique flavor from a process of fermentation. I always enjoyed gochujang at Korean restaurants. A trip to a Korean market and I saw dozens of brands and varieties of gochujang, but a quick reading of the ingredient label turned me off. Too many chemical preservatives, additives and chemical compounds.
When I was given a bottle of Chung Jung One Gochujang Sauce, I read the ingredient list. There were no chemicals, no wheat and no animal products only the essentials of red pepper powder, rice, cane sugar, water and rice wine vinegar. A little heat and a little sweet. Perfect.
With a little experimentation, I discovered two very good uses of gochujang. I used gochujang instead of Tabasco to a Bloody Mary, adding a level of deep, richly flavored umami to that classic cocktail. And, I used gochujang to spice up a comfort food treasure, chicken and dumplings.
Gochujang Bloody Mary
Use a good quality vodka, although its qualities will be masked by the flavors of the seasoned tomato juice. While there are many brands available, I would recommend Chung Jung One's Gochujang Sauce because the ingredients do not include chemicals or preservatives.
Serves 2 (of course!)
Time to prepare: 5 minutes
Ingredients
4 ounces unflavored vodka, preferably Tito's, Prairie or your favorite premium vodka
8 ounces tomato juice, preferably organic and without preservatives or additives
1/2 teaspoon to 1 teaspoon gochujang, depending on preference
1/4 teaspoon Worcestershire sauce
2 pinches freshly ground black pepper
1/4 teaspoon freshly squeezed lime juice
1/4 teaspoon freshly squeezed lemon juice
2 lime wedges to garnish
2 celery sprigs with leaves to garnish
Directions
Fill a large shaker with all liquid ingredients. Shake well to mix.
Fill two large glasses with ice. Pour all the mix into the glasses. Place a celery sprig into the glass and a lime wedge on the edge of each glass.
Gochujang Spicy Chicken and Dumplings
Use seasonal vegetables you enjoy. I used string beans, carrots, onions, broccoli leaves and shiitake mushrooms, but shelled English peas, cauliflower florets, celery and turnips would also be good. I would recommend Chung Jung One's gochujang but if that is not available, use another.
Use homemade chicken stock. Store bought stock has a higher salt content.
Serves 2
Time to prep: 15 minutes
Time to cook: 35 minutes
Total time: 50 minutes
Ingredients for the dumplings
1 cup all-purpose flour
1/4 teaspoon baking soda
2 tablespoons gochujang
1/8 teaspoon sea salt
Pinch of freshly ground black pepper
1/4 cup sweet butter, chilled, cut into dime sized pieces
1 cup half and half
Ingredients
1 cup cooked chicken, cut into dime sized pieces
1/4 cup string beans, washed, ends trimmed off, cut into 1" long pieces
1/4 cup carrots, washed, peeled, cut into 1/2" pieces
1/4 cup yellow onion, washed, peeled, cut into 1/2" pieces
1/4 cup broccoli leaves julienned or broccoli florets, cut into 1/2" pieces
2 cups chicken stock
1 tablespoon extra virgin olive oil
Sea salt and freshly ground black pepper to taste
Directions for the dumplings In a small mixing bowl, mix together all the ingredients. Stir well to break up the butter. Set aside.
Directions Heat a 6 quart sauce pan on a medium flame. Add olive oil and all the chicken and vegetables. Stir well and sauté 5 minutes.
Add chicken stock. Bring to a simmer.
Make dumplings using two soup spoons and place gently into the simmering stock. After all the dumplings are in the sauce pan, cover and continue cooking 30 minutes.
We are planning a Super Bowl Sunday party. My plan is to serve "picnic" food. Carrot salad, potato salad, Little Gem green salad, Persian salad, crispy fried chicken, brown sugar salmon and roasted artichokes.
Super Bowl Sunday food should be fun, delicious and healthy.
Spring is happening and artichokes are showing up in our farmers markets. The dark green vegetable, prized by cooks, is healthy and easy-to-prepare.
Looking at an artichoke, with its hard exterior and sharp pointed leaves makes me wonder how anyone figured out they would be good to eat. With a small amount of effort, that tough looking exterior gives up the wonderfully savory flavor bits at the end of the each leaf.
Choosing a good artichoke
Whether you find one that is the size of your hand or a larger one the size of a soft ball, give it a squeeze. If the artichoke feels solid, you've found a good one. An artichoke past its prime will be squishy like a child's squeeze toy. Make sure all the leaves are green. Don't buy an artichoke with brown or blackened leaves.
Having a sharp pair of scissors or kitchen shears, a pairing knife and a chefs knife will make breaking down the artichoke easy.
Roasted Artichokes
One person can easily eat one artichoke the size of your hand. The larger artichokes will feed 2-3 people as an appetizer or a side dish.
4 medium sized or 2 large artichokes, washed
1 tablespoon kosher salt
2 tablespoons olive oil
1 teaspoon sea salt
1/2 teaspoon black pepper
1/4 cup sweet butter (optional)
Directions
Preheat oven to 350F.
Place a large stock pot on the stove on a high flame. Add kosher salt. Bring to a low boil. Cover.
To roast the artichoke sections after boiling, cover the bottom of a baking sheet with parchment paper, a Silpat sheet or a piece of aluminum foil. Set aside.
Using scissors trim off the pointy end of each artichoke leaf.
Trim off the stem of each artichoke, flush to the bottom. Discard the stems.
Give each artichoke a flat-top haircut. Place the artichoke on its side. Using a chefs knife, trim off the top 1/4" of each artichoke and discard.
Place the artichoke on the cutting board. Using a chefs knife, cut each artichoke in half, from bottom to the top. Cut each half into two pieces. If the artichoke is large, cut those four pieces in half, creating eight segments.
Working quickly, because the inside of the artichoke will discolor when exposed to air, use a sharp pairing knife to remove the fuzzy part on the inside of each section. Rinse the artichoke sections and discard the fuzzy parts.
Place all the artichoke sections in the boiling salted water. Cover and cook 10 minutes.
Using the pairing knife, test one of the artichoke sections. The knife should easily go into the fleshy part on the bottom of the leaves. If the knife doesn't go in easily, cook another 5 minutes but beware not to over cook the artichokes. They should be firm not mushy.
Place a colander or strainer in the sink. Pour the hot salted water with the artichoke sections into the colander and drain.
Transfer the artichoke sections to a mixing bowl. Drizzle with olive oil. Season with sea salt and black pepper. Toss well to coat.
Arrange the artichokes on the prepared baking sheet, leaving room between the sections.
Place in the oven and cook 15 minutes. Using tongs, turn the sections over and place back in the oven another 15 minutes so they cook evenly.
If serving with melted butter (optional), melt the butter in a small saucepan being careful to avoid burning.
Remove the artichokes from the oven and serve hot or at room temperature. Accompany with sea salt, black pepper and small dishes of melted butter (optional).
A few years ago I convinced a chef to teach me how he made crispy skin on a filet of fish. Chef Taylor Boudreaux said it was easy. I couldn't believe that. For years I had tried to cook a filet of fish with the skin on and the result wasn't good. Either the skin was chewy or burnt to a crisp.
When I ate Boudreaux's salmon filet with mushrooms, the charred skin was crisp as a slice of perfectly cooked bacon. A perfect contrast to the moist, sweet flesh.
He reveals the secret in the video. A carbon steel pan. That's it. The pan takes an incredible amount of heat. Up to 700F. The skin sizzles and in seconds is perfectly seared. A quick flip to char the flesh and then into a 350F oven to cook the filet on the inside.
After I bought a pan and seasoned it and used it successfully on a fish filet, I discovered the pan's other advantage. Easy clean up. Very much like a cut-down wok, the pan needs only a quick cleaning with a soapy sponge to remove the left-over oil, heated again on the stove top to burn off the water and that's it. No strenuously scrubbing to clean the pan the way I had done for years with the stainless steel pans I relied upon. Just a quick clean up and I was done.
A cast iron pan also works well at high heat, but from my experience the carbon steel pan does a better job. Both pans are relatively inexpensive. A carbon steel pan will cost half the price of a comparably sized, quality stainless steel pan. Cast iron pans are easy to find. Carbon steel pan, not so much. In the Los Angeles area, the only source of the pans is Surfas Culinary District. In New York, I have seen them upstairs at Zabar's.
Using the pan exclusively, I discovered the beautiful work it does on steaks. Treated very much in the same way as the fish filets, each side of the dry seasoned steak is charred and then placed into a 350F oven to cook the interior of the steak.
After that, I moved on to tofu, shrimp, octopus and chicken breasts. And then to vegetables. Broccoli, shiitake mushrooms, Japanese eggplant, carrots, asparagus, green beans, English peas and corn kernels. Every firm fleshed vegetable I tried worked perfectly when I applied high heat using the carbon steel pan.
For a Zester Daily article I wrote about creating a charred garbanzo bean salad using a mix of charred vegetables and freshly chopped Italian parsley.
The mix of seared vegetables, lightly caramelized by the high heat, and the freshness of the parsley is really delicious. Please take a look and let me know what you think. Thanks!
Spring is happening and farmers markets are filling up with artichokes. The dark green vegetable, prized by cooks, is healthy and easy to prepare.
Looking at an artichoke, with its hard exterior and sharp pointed leaves makes me wonder how anyone figured out they would be good to eat. With a small amount of effort, that tough looking exterior gives up the wonderfully savory flavor bits at the end of the each leaf.
Choosing a good artichoke
Whether you find one that is the size of your hand or a larger one the size of a soft ball, give it a squeeze. If the artichoke feels solid, you've found a good one. An artichoke past its prime will be squishy like a child's squeeze toy. Make sure all the leaves are green. Don't buy an artichoke with brown or blackened leaves.
Having a sharp pair of scissors or kitchen shears, a pairing knife and a chefs knife will make breaking down the artichoke easy.
Roasted Artichokes
One person can easily eat one artichoke the size of your hand. The larger artichokes will feed 2-3 people as an appetizer or a side dish.
Serves 4
Ingredients
4 medium sized or 2 large artichokes, washed
1 tablespoon kosher salt
2 tablespoons olive oil
1 teaspoon sea salt
1/2 teaspoon black pepper
1/4 cup sweet butter (optional)
Directions
Preheat oven to 350F.
Place a large stock pot on the stove on a high flame. Add kosher salt. Bring to a low boil. Cover.
Using scissors trim off the pointy end of each leaf.
Trim off the stems of each artichoke, flush to the bottom. Reserve the stems.
Trim off the top 1/4" of each artichoke and discard.
Using a chefs knife, cut each artichoke in half, from bottom to the top. Cut each half into two pieces. If the artichoke is large, cut those four pieces in half, creating eight segments.
Working quickly because the inside of the artichoke will discolor when exposed to air, use a sharp pairing knife to remove the fuzzy part on the inside of each section. Discard.
Place all the artichoke sections and the stems in the boiling salted water. Cover and cook 10 minutes.
Cover the bottom of a baking sheet with parchment paper, a Silpat sheet or a piece of aluminum foil.
Using the pairing knife, test one of the artichoke sections. The knife should easily go into the fleshy part on the bottom of the leaves. If the knife doesn't go in easily, cook another 5 minutes.
Place a colander or strainer in the sink. Pour the water with the artichoke sections into the colander and drain.
Transfer the artichoke sections and stems to a mixing bowl. Drizzle with olive oil. Season with sea salt and black pepper. Toss well to coat.
Arrange the artichokes and stems on the prepared baking sheet.
Place in the oven and cook 15 minutes. Using tongs, turn the sections over and place back in the oven another 15 minutes so they cook evenly.
If serving with melted butter (optional), melt the butter in a small saucepan being careful to avoid burning.
Remove the artichokes from the oven and serve while hot. Accompany with sea salt, black pepper and small dishes of melted butter (optional). Trim the stems down to the round center, chop and use in a salad.
At holidays, delicious hams, turkeys and roast meats take center stage at the table. A bone in ham, crusted on the outside with brown sugar and spices, turns sweet on the inside after a generous amount of oven roasting. Turkeys, basted and browned, arrive at the table warm, moist, sliced and ready to eat. As much as I love those entrees, what brings a meal to perfection are the side dishes.
Infinitely variable, side dishes range from steamed rice, which goes with just about anything, to spicy kimchi flavored vegetables. For Sunday dinner I like to keep the sides simple.
Today I made two dishes that I really enjoyed. Roasted Brussels sprouts, sliced thin and tossed with yellow onions, dressed with olive oil and seasoned with sea salt and black pepper come out of the oven tender in the center and crisp on the edges. The same technique worked well with green cabbage, sliced like slaw, thin and long, tossed with onions and dressed the same as the Brussels sprouts.
Served separately, they were joined on the plate with a roast chicken with crispy skin and soft, sweet meat. If umami exists in a single dish, the chicken with its two sides was umami on a plate.
Easy to prepare and delicious, the sides are perfect for an Easter lunch, Christmas dinner or any meal in between.
Roasted Shredded Brussels Sprouts
Use any size sprouts available in a farmers market. I was lucky enough to find large ones that were easy to slice. Besides trimming off the end of the stem, also peel away and discard any of the outer leaves that have yellowed.
Serves 4 Prep time: 10 minutes
Cooking time: 60 minutes
Total time: 70 minutes
Ingredients
2 pounds Brussels sprouts, washed, trimmed
1 medium yellow onion, root end and outer skin removed, washed
2 tablespoons olive oil
Sea salt to taste
Black pepper, freshly ground, to taste
Directions
Pre-heat the oven to 400 F.
Line a large roasting pan with a Silpat sheet or parchment paper.
Using a sharp chefs knife, slice the Brussels sprouts and onion lengthwise as thin as possible.
Place the shredded Brussels sprouts and onion slices in a mixing bowl, drizzle with olive oil and season with sea salt and black pepper. Toss well.
Spread out on the lined roasting pan. As much as possible, do not let the Brussels sprouts overlap. They are more likely to crisp if they do not cover one another.
Place in the oven. After 30 minutes, use metal tongs to turn over the Brussels sprouts and return to the oven.
When they are crisp along the edges but not dried out, remove from the oven and place in a bowl.
Serve hot.
Roasted Green Cabbage Slaw
At the farmers market, select a cabbage that is firm and about 6-8" in diameter.
Serves 4
Prep time: 10 minutes
Cooking time: 60 minutes
Total time: 70 minutes
Ingredients
1 green cabbage head washed, yellowed outer leaves removed
1 medium yellow onion, root end and outer skin removed, washed
2 tablespoons olive oil
Sea salt to taste
Black pepper, freshly ground, to taste
Directions
Pre-heat the oven to 400 F.
Line a large roasting pan with a Silpat sheet or parchment paper.
Using a sharp chefs knife, cut the cabbage head in half lengthwise. Using a paring knife, make a triangular cut at the bottom of the cabbage to remove the thick stem at the bottom. Save to use in soup or discard.
Place each half of the cabbage flat side down on a cutting board. Using the chefs knife, make very thin slices, cutting from the top to the bottom until you have shredded both halves of the cabbage.
Slice the onion in the same manner.
Place the shredded cabbage and sliced onion into a large mixing bowl, drizzle with olive oil and season with sea salt and black pepper. Toss well.
Spread out on the lined roasting pan. As much as possible, do not let the cabbage slices overlap. The cabbage and onions are more likely to crisp if they do not cover one another.
Place in the oven. After 30 minutes, use metal tongs to toss the cabbage and onions. Return to the oven.
When the cabbage slices and onions are crisp along the edges but not dried out, remove from the oven and place in a bowl.
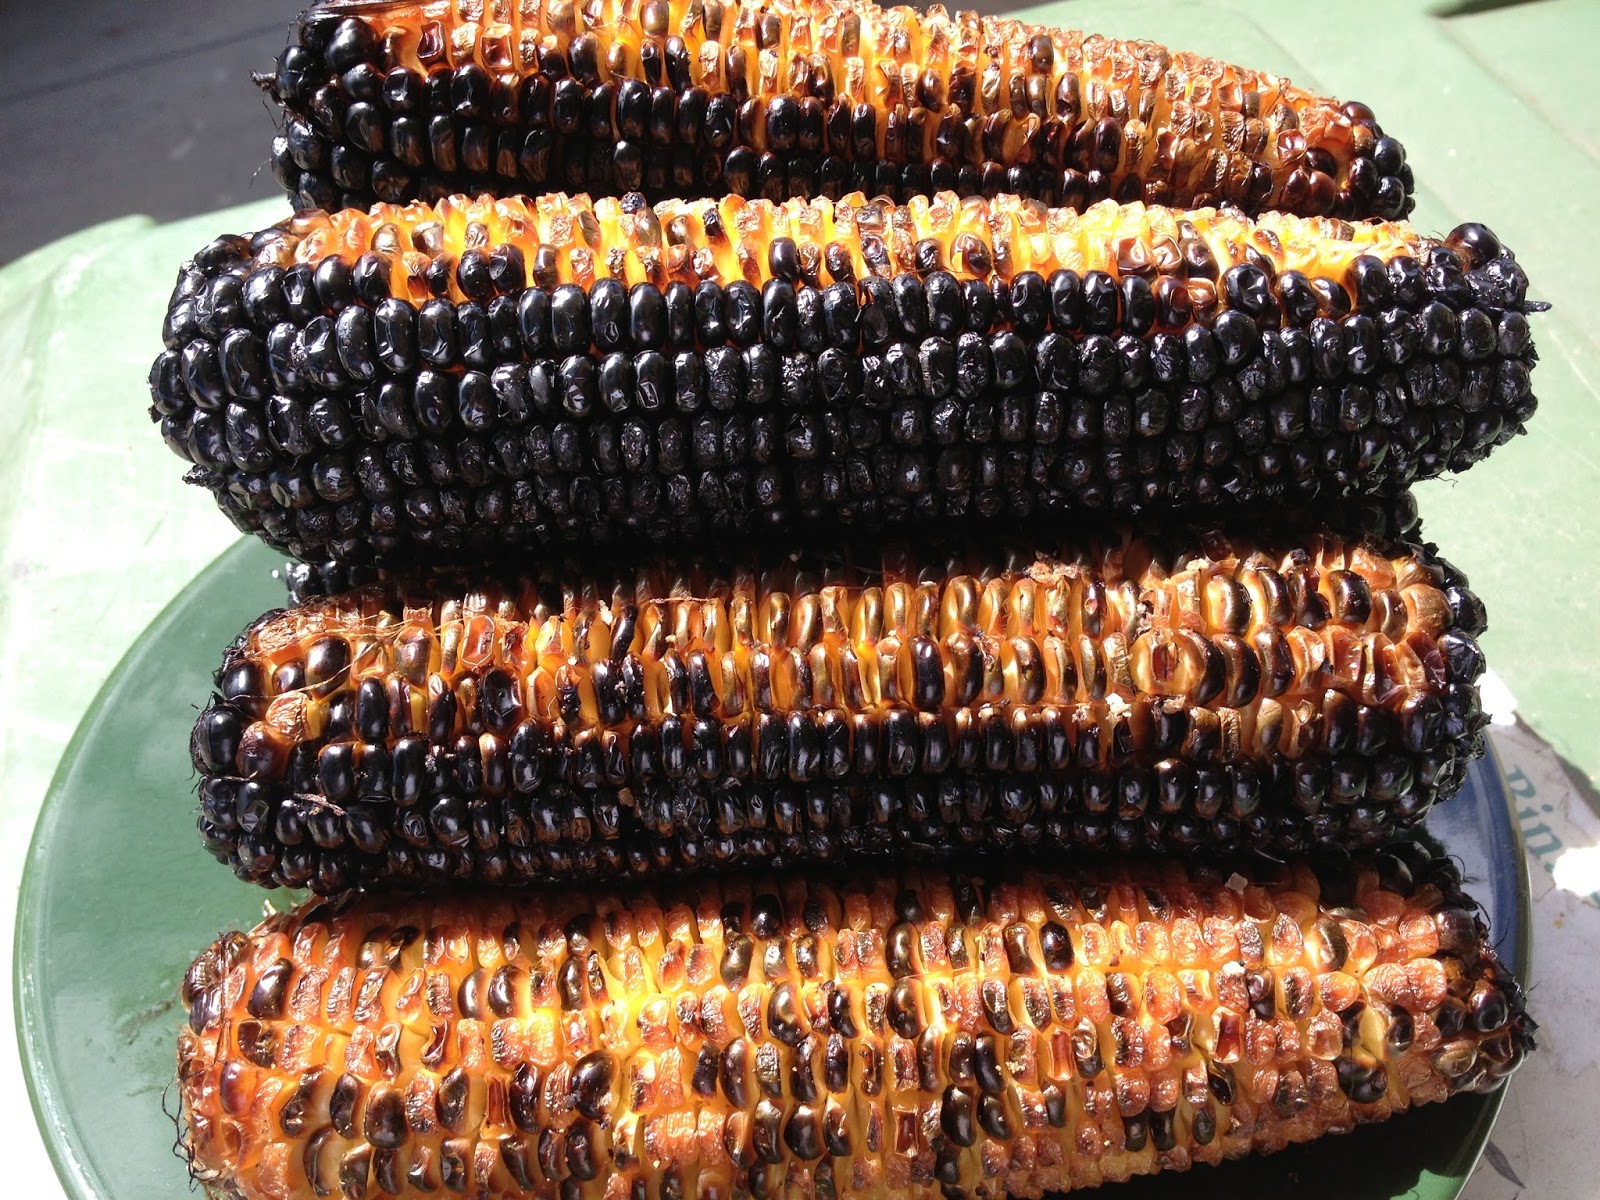
Cardinal sin of cooking. Put a pan on the stove or a steak on the barbie and then go answer a couple of emails. Minutes pass. The emails are sent. A link sent from The Wrap leads to a few more minutes following the latest entertainment news and gossip. More minutes pass as checks are written to pay bills due in three days.
Then....what's that scent in the air? Sweet smoke with a hint of bitterness. Oh, yeah, that's the bacon in the frying pan or the ears of corn on the grill, now burnt to a blackened crisp. Perfect for the trash and compost bin but definitely no good for the table.
First rule of cooking: use a timer.
Second rule of cooking: keep it with you.
Third rule of cooking: when it goes off, check what you are cooking.
Yesterday I was making grilled corn for one of my favorite summer salads: chopped italian parsley with grilled corn. Simple, easy-to-make and delicious, the salad is such a summer treat. The perfect kind of dish to serve with grilled meats, fish and poultry.
The ears of corn were husked, washed and dried, then dredged through seasoned olive oil and placed on the grill. Nothing could be easier. All I had to do was turn the ears every couple of minutes, take them off the grill, let them cool and remove the kernels, toss them with freshly cut parsley and season the salad with more olive oil and reduced balsamic vinegar.
Easy, except I burnt the nine ears of corn.
That meant a dash back to the Sunday farmers market to pick up nine more ears from Underwood Family Farms and do it all again.
And so it goes. Use a timer. Carry it with you. Listen when it goes off. And all will be good.
Parsley and Grilled Corn Salad
Yield 4 servings
Ingredients
2 ears corn, husks and silks removed, washed, dried
1 bunch Italian parsley, washed, stems discarded, leaves finely chopped
2 tablespoons olive oil
4 tablespoons balsamic vinegar
Sea salt and black pepper to taste
Directions
Pre-heat the grill to medium-hot or set the oven to 350 F.
Pour 1 tablespoon olive oil on a large plate or baking tray, season with sea salt and black pepper and dredge each ear of corn to coat.
Using tongs, place the seasoned ears of corn on the grill or on a parchment lined baking tray in the oven.
Turn every 3-5 minutes so the kernels brown but don't burn. Remove once the some of the kernels have browned. Set aside to cool.
Using a sharp chefs knife, cut the kernels off the cobs and collect in a large mixing bowl.
Add the finely chopped Italian parsley, toss well and dress with the remaining olive oil.
Place the balsamic vinegar in a small saucepan over low heat. Gently reduce to 1 tablespoon. Allow to cool and add to the corn and parsley mixture. Toss well.
Serve cold or at room temperature.
Variations
Add 2 tablespoons raw or grilled onions.
Add 1 avocado, diced.
Add 6 quartered cherry tomatoes.
Add dusting of cayenne.
Add 2 cups cooked chicken breast or grilled shrimp.