Showing posts with label Easy-to-Make Recipes. Show all posts

Monday, March 22, 2021

Carbon Steel Pans Sear in Flavor with High Heat and Easy Clean Up

A few years ago I convinced a chef to teach me how he made crispy skin on a filet of fish. chef Taylor Boudreaux said it was easy. I couldn't believe that. For years I had tried to cook a filet of fish with the skin on and the result wasn't good. Either the skin was chewy or burnt to a crisp.

When I ate Boudreaux's salmon filet with mushrooms, the charred skin was crisp as a slice of perfectly cooked bacon. A perfect contrast to the moist, sweet flesh.

He reveals the secret in the video. A carbon steel pan. That's it. The pan takes an incredible amount of heat. Up to 700F. The skin sizzles and in seconds is perfectly seared. A quick flip to char the flesh and then into a 350F oven to cook the filet on the inside.

After I bought a pan and seasoned it and used it successfully on a fish filet, I discovered the pan's other advantage. Easy clean up. Very much like a cut-down wok, the pan needs only a quick cleaning with a soapy sponge to remove the left-over oil, heated again on the stove top to burn off the water and that's it. No strenuously scrubbing to clean the pan the way I had done for years with the stainless steel pans I relied upon. Just a quick clean up and I was done.

A cast iron pan also works well at high heat, but from my experience the carbon steel pan does a better job. Both pans are relatively inexpensive. A carbon steel pan will cost half the price of a comparably sized, quality stainless steel pan. When you shop for a carbon steel pan, buy one that is made with a thicker gauge steel. I have been using de Buyer pans. Chef Boudreaux recommends Matfer Bourgeat. The advantage of the thicker gauge pans is they retain heat longer than the pans made with a thinner steel.

Cast iron pans are easy to find. Carbon steel pans, not as much. In the Los Angeles area, the only source for the pans is Surfas Culinary District. In New York, I have seen them upstairs at Zabar's

Recently, I have seen a great many De Buyer pans on Amazon. I recommend looking there. Given the variety of De Buyer pans, I recommend the frying pans, not the pans with higher, rounded sides and frying pans with smooth bottoms. The ribbed bottoms are excellent to create grill marks, but the ribs inhibit good sautéing.


Using the pan exclusively, I discovered the beautiful work it does on steaks. 


Treated very much in the same way as the fish filets, each side of the dry seasoned steak is charred and, if the steak is more than 1" thick, then placed into a 350F oven to cook the interior of the steak for five minutes. While the steak is resting for five minutes under aluminum foil, quickly sear your favorite vegetables in the pan to pick up the pan dripping flavor and serve as a side dish.


After that, I moved on to tofu, shrimp, octopus and chicken breasts. And then onto vegetables. Broccoli, shiitake mushrooms, Japanese eggplant, carrots, asparagus, green beans, English peas and corn kernels. Every firm fleshed vegetable I tried worked perfectly when I applied high heat using the carbon steel pan.

Blast the Heat for For A Charred Vegan Salad

Chef Tips For Crispy Skin Pan Seared Salmon Filets

Friday, November 20, 2020

Thanksgiving's Best Appetizer: Turkey Liver Pâté

Usually we order a twenty pound turkey to feed the twenty to twenty-five friends and family who gather at our home for Thanksgiving.


In this 2020-COVID year, we only need a twelve pound turkey for the five of us. That will leave us a good supply of left-overs that we can turn into turkey stew with dumplings, turkey salad and turkey sandwiches. With the bones we can make several quarts of turkey stock to freeze in pint-sized containers to use during the winter when we crave comfort-food turkey soup with vegetables.


With a smaller guest list finalized and our favorite recipes organized, there is only one unanswered question: what to do with the turkey liver?
Even people who love chicken livers view turkey liver as too much of a good thing.
Whoever has the job of prepping the turkey on Thanksgiving Day frequently looks with bewilderment at the large double-lobed liver in the bag tucked ever so neatly inside the turkey.
Following my mother’s lead, my solution is to turn lemons into lemonade or, in this case, turkey liver into pâté.
My mother prepared chicken chopped liver using a shallow wooden bowl and a beat-up, double-handled, single-bladed mezzaluna knife that her mother had given her.
She would cut up and sauté the liver with a chopped up onion. Two eggs would go into boiling water. Once hard-boiled, they would join the sautéed liver and onion in the wooden bowl, which she would hand to me along with the mezzaluna.
While she prepared the chicken, she put me to work.
As a 9-year-old, I would sit on a stool with the wooden bowl on my lap, rocking the mezzaluna back and forth, chopping up the livers and hard-boiled eggs.
Periodically my mother would check on my progress and, when everything was reduced to a fine chop, she would retrieve the bowl, add melted chicken fat and mix everything together.
Just before our guests arrived, she transferred the chopped liver to a serving bowl and put it on the dining room table with a plate of saltines and the other appetizers, a platter of black pitted olives, whole radishes and vegetable crudités.

I have adapted her recipe to use turkey liver. The result is the same. A creamy, tasty, fat-satisfying umami flavor.

Mushroom and Turkey Liver Pâté

My mother liked her chopped liver rustic style. It is a matter of taste, but I prefer turkey liver when it is made with a food processor, creating a smooth pâté.
To balance the richness of the liver, the pâté needs sweetness (caramelized onions), saltiness (sea salt), heat (black pepper) and earthiness (hard-boiled egg and mushrooms).
Serves 8
Ingredients
1 turkey liver, approximately ½ cup

2 fresh, large eggs

2 medium yellow onions, ends and peel removed, washed, roughly chopped

2 cups mushrooms, brown, shiitake or portabella, washed, roughly chopped

¼ cup Italian parsley, washed, leaves only, roughly chopped

2 garlic cloves, skins removed, washed, finely chopped (optional)

2 tablespoons sweet butter

¼ cup olive oil

sea salt and black pepper
Directions
  1. Wash the uncooked liver and pat dry. Using a sharp paring knife, remove and discard all fat and membranes. Cut liver into half-dollar-sized pieces.
  2. Place the eggs into a pot of boiling water. Cook 10 minutes, remove from water, let soak in cold water to cool, remove and discard shells.
  3. In a large sauté pan over a medium flame, melt the butter and lightly brown the onions, mushrooms, parsley and garlic. Add the pieces of turkey liver and sauté until lightly brown being careful not to overcook the liver, which should be pink inside. Season with sea salt and black pepper.
  4. Using a rubber spatula, scrape the sautéed liver and vegetables into a large food processor, add the hard-boiled eggs and pulse. Slowly add olive oil, a little at a time. Use the rubber spatula to push any accumulation off the sides of the mixing bowl.
  5. Continue pulsing and adding small amounts of olive oil until the pate is creamy. Depending on the size of the turkey liver, you might use more or less of the olive oil. Taste and adjust the seasoning with sea salt and pepper.
  6. Use the spatula to transfer the pâté from the food processor to a serving bowl. Cover with plastic wrap and refrigerate. The pâté can be kept in the refrigerator 1-2 days.
  7. Before serving, take the pâté out of the refrigerator, place on the counter out of the sun and allow to come to room temperature. Serve with crackers, toast points, fresh sourdough or French bread.
Variations
  • Instead of Italian parsley, use 1 teaspoon finely chopped fresh rosemary leaves.
  • For a denser pâté, use 1 hard-boiled egg instead of 2.
  • Add ¼ teaspoon cayenne powder to the sauté for heat.
  • Add 1 slice bacon, finely chopped to the sauté and brown until crisp.
  • Add 1 teaspoon balsamic vinegar to the sauté.
  • Sprinkle 2 tablespoons red onion or scallions, finely chopped, over the pâté just before serving.


Monday, September 14, 2020

Preparing for Cold Weather with a Gathering of Summer Tomatoes

Time to post my suggestions about taking advantage of summer's bounty. 

Difficult to believe, summer is winding down. Even as the heat of the sun makes us wonder if summer will ever end, as the saying goes, "Winter is coming."

Walking through the farmers markets, I see a great abundance of tomatoes. With that abundance comes lower prices. Find a farmer who has too much of a good thing and the price comes down even more.


"Reduced to sell." "Soft ready to eat." Those are the tomatoes I look for. I'll buy them by the bagful. Five or ten pounds at a time. My plan is to prepare for a time when fresh tomatoes are a thing of the past.


I am anticipating a time when storm clouds are outside and I'm staring into the refrigerator looking for inspiration. I yearn for the produce of summer: leafy greens, corn and full-bodied tomatoes. But there is a way to enjoy the sweet-acidic deliciousness of tomatoes even in the darkest days of winter. Just look in your freezer.
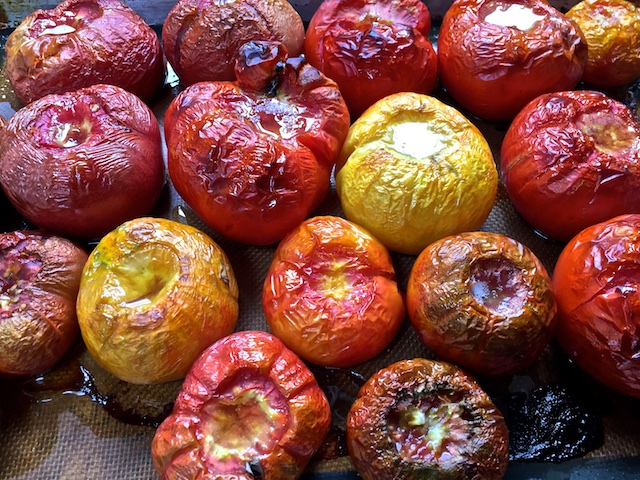
With abundant tomatoes in the farmers markets, buy ripe tomatoes, roast and freeze them to be used in braises, soups and sauces in the fall and winter. Once blasted with heat in the oven, the tomatoes happily take to the freezer if they are covered in liquid.
Enjoy frozen roasted tomatoes whole or puree into sauce, and as rain beats against your windows and snow accumulates on your lawn, you will remember those heady summer flavors.

Oven-roasted tomatoes to use as a side dish or in sauces

Use ripe and over-ripe tomatoes. If you can find only unripe, hard tomatoes, leave them in a sunny spot on the kitchen counter until they ripen. Bruised tomatoes are OK as long as you use a sharp paring knife to remove the damaged parts. Avoid tomatoes with broken skin because of the risk of mold.
Any kind of tomato can be used: heirloom, Roma, cherry, large or small salad tomatoes.
A food mill is helpful when making the sauce. If one is not available, a fine meshed wire strainer will do almost as well.


When roasting the tomatoes, it is important to use parchment paper or a nonstick Silpat mat to prevent the tomatoes from sticking to the baking sheet. With a Silpat mat, none of the good bits and sweetly-delicious liquids that caramelize on the bottom are wasted.

Roasted Tomatoes

Tomatoes love the sun’s heat when they’re growing. And they love the oven’s heat that coaxes a rich umami sweetness out of their naturally acidic souls.
That sweetness is at the heart of the roasted tomatoes that will be in your freezer.
Prep time: 5 minutes
Roasting time: 60 minutes
Yield: 1 to 2 quarts
Ingredients
5 pounds tomatoes, washed, patted dry
1 tablespoon olive oil
¼ teaspoon sea salt
¼ teaspoon freshly ground black pepper
Directions 
1. Preheat oven to 350 F.
2. Line a large baking sheet with a Silpat mat or parchment paper cut to size. Use a baking sheet with a 1-inch lip to capture any liquids created during roasting.
3. Use a sharp paring knife to cut a “V” shape around the stem, remove and discard. With cherry tomatoes, any stems can be brushed off the surface without making a cut.
4. Place the de-stemmed tomatoes on the lined baking sheet, stem side up.
5. Drizzle with olive oil and season with sea salt and pepper.
6. Place in oven and roast 60 minutes.
7. Remove and let cool.

Freezing Whole Roasted Tomatoes

When you remove the baking sheet from the oven, you’ll notice a clear liquid has accumulated on the bottom. Some of that is olive oil. But most of the liquid is a clear tomato essence prized by chefs for its clean flavor.
If you are freezing some of the roasted tomatoes whole, use the clear liquid to cover the tomatoes in the deli containers.
Use airtight containers that are about the same width as the tomatoes so you will need a small amount of liquid to cover them.

Defrosting Whole Roasted Tomatoes

When you want to use the tomatoes, take them out of the freezer in the evening and let them defrost overnight. If any ice crystals have accumulated on top of the tomatoes, rinse off the ice before defrosting.
If you want to serve them whole, the tomatoes can be warmed in the oven or microwave. They are delicate, so handle them carefully.

Whole Roasted Tomato, Easy-to-Make Pasta Sauce

A deliciously simple pasta sauce to make any time of the year, not just in winter. Serve the pasta with steamed vegetables, a charred steak or a grilled chicken breast and you will have a perfect cold weather meal that warms body and soul.
The flavorful tomato sauce can become a vegan dish by simply omitting the butter and cheese.
Prep time: 5 minutes
Sauté time: 5 minutes
Pasta cooking time: 10 minutes
Total time: 10 minutes
Serves 4

Ingredients
1 tablespoon sea salt
1 pound fresh or packaged pasta
1 tablespoon olive oil
1 cup Italian parsley leaves, washed, roughly chopped (optional)
1 garlic clove, peeled, finely chopped
2 to 3 whole, large roasted tomatoes, skins removed
1 teaspoon sweet butter (optional)
Freshly ground black pepper to taste
1 cup freshly grated Parmesan or Romano cheese
Sea salt and freshly ground black pepper to taste
Directions
1. Place a large pot of water on high heat. Add 1 tablespoon sea salt to the water. Bring to a boil. Add the pasta. Stir well every 2 to 3 minutes.
2. Place a heat-proof cup in the sink next to a large strainer. When the pasta is al dente to your taste, about 10 minutes, pour the pasta into the strainer, capturing one cup of the salted pasta water. Reserve.
3. Toss the cooked pasta to prevent clumping.
4. At the same time the pasta is cooking, place a large sauté pan on a medium-high flame. Heat the olive oil.
5. Add the parsley and garlic. Lightly brown.
6. Holding the roasted tomatoes over the sauté pan, use your hands to tear them apart so you capture all the liquid. Add any liquid from the deli container.
7. Stir well and cook until the liquid is reduced by half.
8. Taste and salt, if needed; add a tablespoon or more of the pasta water.
9. Stir well and add butter. Taste and adjust seasoning by adding sea salt and black pepper.
10. When ready to serve, add the cooked pasta to the sauté pan. Over a medium flame, toss the pasta in the sauce to coat.
11. Serve hot with a bowl of Romano or Parmesan cheese.

Roasted Tomato Sauce

The tomatoes used to make the sauce are prepared and roasted in the same manner as those used to create whole roasted tomatoes.
Directions
1. Working with small batches, remove the roasted tomatoes from the baking sheet and put some of the roasted tomatoes into a food mill or fine mesh, wire strainer placed over a nonreactive bowl. Press the tomatoes through, collecting all the juice in the bowl.

2. Use a spatula to scrape off the pulp that will accumulate on the bottom of the food mill or the strainer. Add the pulp to the juice.

3. Discard the tomato skins. Or add to your compost. Or, even better, reserve in the freezer to use with other vegetable scraps to make vegetable stock.

Freezing Roasted Tomato Sauce

Put the open deli containers on a counter. Stir the tomato juice to mix with the pulp.

Fill each deli container to a half-inch below the top so that when the sauce freezes, the liquid will have room to expand and will not force open the lid.
When cooled, the filled containers can be placed in the freezer.

Defrosting Roasted Tomato Sauce

Even without defrosting, the frozen sauce can be used at the last minute, when you want to thicken a soup, add a layer of flavor to a braise or make a simple pasta sauce.
There are infinite ways to use this versatile sauce. One of my favorites is an easy-to-make pasta with sautéed vegetables.
If any ice crystals accumulate on the top of the sauce, rinse off the ice before defrosting.

Penne Pasta With Roasted Tomato Sauce and Sautéed Vegetables

Prep time: 10 minutes
Sauté time: 10 minutes
Pasta cooking time: 10 minutes
Total cooking time: 20 minutes
Yield: 4 servings
Ingredients
1 tablespoon sea salt
1 pound fresh or packaged pasta
2 tablespoons olive oil
2 carrots, washed, stems removed, peeled, cut into rounds
1 medium yellow onion, washed, stems removed, peeled, roughly chopped
8 large shiitake mushrooms, ends of the stems removed, washed, patted dry, roughly chopped
2 cups broccolini or broccoli, washed, cut into florets, the stems cut into slabs
2 garlic cloves, peeled, smashed, finely chopped
12 ounces frozen tomato sauce, defrosted on the counter overnight
1 tablespoon sweet butter (optional)
¼ teaspoon pepper flakes or pinch of cayenne (optional)
Sea salt and freshly ground black pepper to taste
1 cup freshly grated Parmesan or Romano cheese
Directions
1. Place a large pot of water on high heat. Add 1 tablespoon sea salt to the water. Bring to a boil. Add the pasta. Stir well every 2 to 3 minutes.
2. Place a heat-proof cup in the sink next to a large strainer. When the pasta is al dente to your taste, pour the pasta into the strainer, capturing one cup of the salted pasta water. Reserve.
3. Toss the cooked pasta to prevent clumping.
4. At the same time the pasta is cooking, place a large sauté pan on a medium flame.
5. Heat the olive oil.
6. Add carrots, onion, shiitake mushrooms, broccolini and garlic. Sauté until lightly browned.
7. Add roasted tomato sauce, butter and pepper flakes. Stir well. Taste. If salt is needed, add a tablespoon or more of the pasta water.
8. Simmer on a medium flame and reduce.
9. Taste, adjust seasoning and continue simmering if you want the sauce to be thicker.
10. When the sauce is the consistency you like, add the cooked pasta, coat well.
11. Taste and adjust the seasoning with more sea salt or black pepper.
12. Serve hot with a bowl of grated Parmesan or Romano cheese.

Monday, March 30, 2020

Ready, Set, Go: Easy-to-Make Gnocchi is a Perfect Staying-at-Home Comfort Food

Making gnocchi is perfect for this time when we are spending a lot of time at home. If you make gnocchi already, you know how easy they are to prepare. If you have enjoyed gnocchi in Italian restaurants, you remember how these heavenly "pillows" make you happy.


I was lucky enough to have chef Mirko Paderno invite me into his kitchen where he did a cooking video showing how to make gnocchi. Please go this link to see Mirko make gnocchi.

Mirko's original recipe was designed to serve 8. I have adapted his recipe to serve 4 people since we cannot currently have dinner parties. I made other small changes as well.

Gnocchi Made with Cold Potatoes

For Paderno, two details are key to making the best gnocchi. The potatoes must be steamed over salted boiling water so the flesh does not become water-logged. And, the dough must be made with cold cooked potatoes so less flour is needed.

By using cold potatoes, the dough can be prepared before the meal, even the day before. But if hot potatoes are used, when the egg and flour are added, the gnocchi must be cooked immediately to avoid becoming soggy.

Paderno uses Idaho russet potatoes because they have a neutral flavor, the better to work with a variety of sauces. But he suggests using any potato you enjoy, even sweet potatoes or purple potatoes. 

Paderno uses “00” flour which blends easily with the potato. If “00” is not available, use all-purpose (AP) flour. 

The amount of flour used partly depends on the moisture of the cooked potatoes. Getting the right density takes a bit of practice. The gnocchi dough should be not too dry and not too damp. Like pastry dough, with a dusting of flour, the gnocchi should roll out without sticking on the work surface. Watch the video to see Paderno’s technique.

Serves 4

Time to prepare: 30 minutes

Time to cook: 30 minutes

Total time: 60 minutes

Ingredients

1 lb. Idaho russet potatoes, washed, skin on
5 ounces “00” or AP flour
2 tablespoons AP flour for dusting
1/2 extra large egg
2 teaspoons kosher salt
1 cup freshly grated Parmesan cheese

Directions

Place a steamer on the bottom of a large pot. Add water only to the bottom of the steamer. Season with 1 teaspoon kosher salt. Bring to a boil. Place potatoes in the pot. Cover.  

Depending on the size of the potatoes, cook 20 minutes or until a paring knife can be inserted into the potatoes easily. Add water as needed if more steaming is required. Remove when the potatoes are soft but not mushy. 

Cool potatoes to room temperature or refrigerate. When it is time to make the gnocchi, peel and discard the skins or reserve to sauté with onions and parsley for breakfast. 

Run the cooked, peeled potatoes through a potato ricer or food mill using a fine blade. If neither is available, press the softened potatoes though a strainer or colander.

The potatoes will now look like strands of soft pasta. Place into a mixing bowl and add flour (preferably "00") and mix well together. 

Sprinkle work area with flour. Place potato-flour mixture on the work area and create a “volcano,” the way you do when making fresh pasta, with a depression in the middle of the mound.

In a bowl, crack open a raw egg and whisk with a fork until the white and yolk are well blended.

Pour 1/2 the egg mixture into the center of the volcano.  Reserve the other 1/2 for another use.

Using the fork and your fingers, work the egg, flour and potato together until all ingredients are combined into a ball. 

As you do with pasta (please see that recipe as well), roll the ball back and forth on the work surface. Sprinkle additional flour to prevent sticking. When the ball is smooth and well-formed, wrap the dough in plastic wrap and place into an air-tight plastic bag and refrigerate for one hour or until the next day.

Before cooking the gnocchi, make a sauce. That can be as simple as a butter sauce with a little pasta water or as complicated as a braised meat ragu.


Shaping the Dough into Gnocchi

Sprinkle the work surface with flour. Work in batches. Cut the dough into four pieces. 

Form one piece of dough into a ball and then using both hands, fingers and palms, roll the potato dough back and forth until it takes the shape of a dowel, about 1” in diameter. 


The dough is forgiving so if the dowel breaks apart, start over.

Once you have made a uniform shape, create individual gnocchi using a pastry cutter or chefs knife. The gnocchi should be approximately 1” long.


It is important to mark each gnocchi using a fork, your finger or a gnocchi board. The indentations will help the sauce stick to each gnocchi.

Cooking the Gnocchi

Fill a large pot with water. Add 1 teaspoon of kosher salt. Bring to a boil.


The gnocchi cook quickly. To determine how much time is needed, place several test gnocchi into the water. 


If the first gnocchi breaks apart, either the water is boiling too fast and/or the potato dough needs more flour, in which case you can return to the work area, gather up the gnocchi, sprinkle with flour, knead together, roll out and cut again.

If your gnocchi hold their shape in the boiling water, test how long they should cook. Taste one after 30 seconds. Taste another after 45 seconds. And another after 60 seconds and so on. Decide which you like and use that timing to make the rest. For my latest batch, 120 seconds worked the best.

Working in batches, carefully drop a dozen gnocchi at a time into the boiling, salted water. 

Using a wire strainer, remove the gnocchi from the boiling water. 

Drain and add to the heated sauce, which can be as simple as sautéed San Marzano tomatoes with olive oil or a tablespoon or two of pasta water mixed with a good quality melted butter. Or more robust with slices of grilled sausage or coated with pesto sauce.

Serve each plate of gnocchi hot, topped with freshly grated Parmesan cheese.

Saturday, March 21, 2020

Ready, Set, Go: One Chicken Makes 3 Meals

Living in a coronavirus world means that markets are stressed by shoppers who need more supplies since they are cooking at home and because people are buying extra. Finding a whole chicken may take a bit of work, but the results are well-worth the effort. 


Restaurants are closed. The home kitchen is now more important than ever. What's needed are easy-to-make recipes that yield not just one but several meals.

A roasted whole chicken is a great way to go.

After you have enjoyed the hot-from-the-oven chicken, by using the bones and pan drippings, you can make a stock, which in turn can be used to make soups and sauces.

My mother and grandmother taught me that to waste food is a sin. In this case, that means always reserving the pan drippings, giblets, neck, heart, bones and carcass of the chicken to make a best-ever stock that you can use to make a delicious chicken-vegetable-rice soup or chicken and dumplings.


If a liver came with the chicken, use it to make a tasty mushroom-chicken liver pate for an amuse bouche.

Serve the whole chicken with sides or make the one chicken serve up several meals by combining a leg, wing or part of the breast with steamed rice and a chopped parsley salad.


Easy to Make, No Fuss Whole Roast Chicken

I have a friend who doesn't cook. For her, a roasted chicken is the ideal dish because it has only a few simple steps. 

As with anything in life, begin with good ingredients to achieve better results. That is especially true in cooking. Buy a good plump, pale-pink chicken, preferably one that was raised without hormones. 

Check the expiration date to confirm it is fresh. 

One chicken 3 1/2 - 4 pounds feeds 4 people. If you are feeding fewer people, the chicken will provide you with even more meals. 

If you aren't going to eat all the meat and stock within 2 days, use plastic wrap to wrap the cooked chicken, place the pieces inside a sealed plastic bag and freeze. 

To freeze the stock, place the liquid in sealable containers, preferably 8 or 16 oz for easy use. 

Only use Diamond Crystal kosher salt. All the other brands I've seen add chemical preservatives. Diamond Crystal does not.

Use a roasting sheet tray larger than the chicken, with 1" sides. 
 A sheet tray with sides lower than a roasting pan facilitates browning on the sides of the chicken. 

Line the bottom with aluminum foil and, if available, a Silpat sheet. 

If a Silpat (non-stick) sheet is not available, lining the pan with aluminum foil is sufficient for easy-clean up. The advantage of a Silpat sheet is that all the delicious drippings slide off easily and can be added to the stock. 

Silpat sheets are widely available in many supermarkets, at all cooking supply stores and online. Use a Silpat sheet that fits the dimensions of your pan.

Truss the chicken with kitchen twine if you want. 


As an option, place Yukon Gold potatoes, brown mushrooms and yellow onions on the bottom of the roasting pan when you turn over the chicken. They will acquire flavor from the drippings. Serve the vegetables with the chicken or use in a soup.

 Serves 4

Time to prep: 15 minutes

Time to cook: 60 - 90 minutes depending on size of chicken

Time to rest before serving: 5 minutes

Special Cooking Tools 

Roasting sheet tray (with a 1" rim)

Aluminum foil and Silpat sheet (optional) to fit the roasting sheet tray

12"-14" kitchen tongs

Roasting rack (optional)

Cooking twine (optional)

Ingredients for roasting

1 whole 3 1/2 - 4 pound chicken, washed, liver, giblets, neck and heart if included, removed, washed and reserved separately

1 tablespoon olive oil

1/4 teaspoon sea salt

1/8 teaspoon freshly ground black pepper

4 medium sized Yukon Gold potatoes, washed, quartered (optional)

1 large yellow onion, washed, peeled, root end and top removed, quartered (optional)

6 brown mushrooms, washed, stem end removed, leave whole (optional)

Directions

First, wash your hands thoroughly with soap and water (remember the 20 second drill), then wash the chicken inside and out with water (no soap). Dry off the outside of the chicken.

Preheat the oven to 400F.

Prepare a roasting pan by lining the bottom with aluminum foil. Place a Silpat sheet on top of the foil and, if available, a roasting rack on top of the Silpat sheet and aluminum foil.

Drizzle olive oil inside and outside the whole chicken and season with sea salt and freshly ground pepper.

Place the chicken breast-side down on a roasting rack, if available. If one is not available, place the chicken breast-side down directly on the aluminum foil/Silpat sheet lined roasting pan and place into the oven.

Cook 30 minutes.

Using oven mitts, remove the chicken from the oven. Place on stove top and use tongs to turn over the chicken so now it is breast-side up.

Add vegetables to the bottom of the roasting pan (optional).


Cook another 30 minutes or until the legs move easily.

Remove from the oven. Place a sheet of aluminum foil on the top. Allow the chicken to rest, to release its juices.

That's it.

To make chicken stock from the bones and pan drippings, please look below to the directions for Making Chicken Stock.

Feta-Brined Roasted Whole Chicken

My favorite roast chicken takes a bit more effort (not that much!) and seven additional ingredients.

To make the roast chicken more festive, I add feta and onions on top. Neither are essential but they add delicious flavors.

Brining the whole chicken for two hours or overnight makes the meat more tender and moist. That extra step is well worth it, but can be omitted.

One chicken 3 1/2 - 4 pounds feeds 4 people. If you are feeding fewer people, the chicken will provide you with even more meals. If you aren't going to eat all the meat and stock within 2 days, wrap the chicken in plastic wrap inside a sealed plastic bag and freeze. To freeze the stock, place the liquid in a sealable container, preferably 8 or 16 oz for easy use. 

My mother and grandmother taught me that to waste food is a sin. In this case, that means always reserving the pan drippings, giblets, neck, heart, bones and carcass of the chicken to make a best-ever stock that you can use to make delicious chicken-vegetable-rice soup or chicken and dumplings.


If a liver came with the chicken, use it to make a tasty mushroom-chicken liver pate to serve as an amuse bouche.

Only use Diamond Crystal kosher salt. All the other brands I've seen put in chemical additives. Diamond Crystal does not.

Use a roasting pan with 1" sides to facilitate browning on the sides of the chicken. 


Line the roasting pan first with aluminum foil and then with a Silpat sheet. If a Silpat (non-stick) sheet is not available, lining the pan with aluminum foil is sufficient for easy-clean up. The advantage of a Silpat sheet is that all the delicious drippings slide off easily and can be added to the stock. Silpat sheets are widely available in many supermarkets, at all cooking supply stores and online. Use a Silpat sheet that fits the dimensions of your pan.

You do not have to truss the chicken with kitchen twine. 

Before beginning, carefully wash the inside and outside of the chicken with fresh water. If brining, place the washed chicken into the liquid. If not, pat dry and season with olive oil, sea salt and freshly ground black pepper on the inside and outside.

 Serves 4

Time to brine: at least two hours or overnight

Time to prep: 15 minutes

Time to cook: 60 - 90 minutes depending on size of chicken

Time to rest before serving: 5 minutes

Special Cooking Tools 

Roasting sheet tray (with a 1" rim)

Aluminum foil and Silpat sheet to fit the roasting sheet tray

12"-14" kitchen tongs

Roasting rack (optional)

Cooking Twine (optional)

Ingredients for roasting

1 whole 3 1/2 - 4 pound chicken, washed, liver, giblets, neck and heart if included, removed, washed and reserved separately

1 tablespoon olive oil

1/4 teaspoon sea salt

1/8 teaspoon freshly ground black pepper

Ingredients for the brine

1/4 cup fresh feta, preferably Bulgarian (because it is less expensive), crumbled

2 tablespoons kosher salt

1 tablespoon white sugar

4 bay leaves, whole

1/4 teaspoon whole black peppercorns

Ingredients for the topping

1 medium onion, washed, top and root end removed, peeled, sliced thin from the top to the bottom

1/2 cup Italian parsley, stems and leaves, washed, drained, finely chopped

1/4 cup fresh feta, Bulgarian, crumbled

2 tablespoons olive oil

1/4 teaspoon sea salt

1/4 teaspoon freshly ground black pepper

Small bowl of flake salt (optional) on the table

Directions for brining

Use twine to tie together the legs and wings (optional)


Place the chicken, salt, sugar and aromatics into a large heavy plastic bag or a container with a lid. Fill with cold water until the chicken is submerged. Seal. If using a plastic bag, place in a large bowl so the water doesn't leak.

Refrigerate at least two hours or overnight.

Directions for Roasting

Preheat oven to 400F.  Line a baking sheet with aluminum foil and a Silpat sheet on top of the foil for easier cleanup. Place a roasting rack on top of the lined baking sheet. If no roasting rack is available, place the chicken directly on the lined baking sheet, breast side down.

Remove the chicken from the brine. Rinse, pat dry and allow to rest uncovered for 10 minutes.

Pour the brine through a colander to capture the feta. Discard the brining aromatics. Remove the feta and reserve.

In a bowl, mix together the feta from the brine, the additional feta, onion, parsley, sea salt and black pepper.

Rub olive oil over the chicken. Add remaining olive oil to the feta-onion-parlsey topping and mix well. Set aside.

Place chicken onto the roasting rack if one is available, breast down and put into the preheated oven. Roast for thirty minutes or until the skin is brown and crisp to the touch.

Reduce oven to 350F.

Using tongs, turn over the chicken, being careful not to tear the skin. Place the chicken breast-side up on the roasting rack.

Cover the breast-side up chicken with the feta-onion-parlsey topping.  The mound of onions will seem large, but will greatly reduce during cooking. If any bits fall onto the bottom of the baking tray, no worries, you can scoop them up later.


Return to the oven. After 30 minutes, check for doneness. Wiggle a chicken leg. If there is resistance, the chicken needs more time. If the topping is getting too brown, place a sheet of aluminum over the top like a tent. Roast another 15 minutes and check for doneness. Continue roasting until the leg moves freely.

Remove from the oven and place a sheet of aluminum foil over the top so the chicken rests for 5 minutes.

Remove aluminum foil. Carve in the kitchen or at the table. Use a recently sharpened knife or kitchen sheers. Plate the chicken with the charred onion-feta-parsley mix on top.

Serve hot with sides of roasted potatoes, squash or salt boiled spinach.

Place a small bowl of flake salt on the table. The crunch of the salt will add to the pleasures of the dish.

Making chicken stock

Once the chicken has been carved, reserve all the bones and pan drippings. If there isn't time to make stock that night, refrigerate and make the next day.

I prefer to make my chicken stock without aromatics or seasoning beyond the flavors provided during roasting. That way, when you use the stock to make soup or a sauce, you can add whatever flavors you want.

To make the stock, add the bones, pan drippings, reserved neck, heart and gizzard to a 3-4 quart pot and add fresh water to cover by 2".

Place on the stove on a medium-high flame, bring to a low boil and simmer 60 minutes or until the liquid has reduced by 1/3. Taste and continue simmering until the flavor is to your liking.

Allow to cool. Strain the liquid into a bowl.  Remove the bones, neck, heart and gizzard. Pick the meat off the bones and reserve the gizzard. The meat and gizzard can be used in a salad, to make chicken and dumplings or to add to a chicken-vegetable soup.

Place stock into containers with lids. 8 and 16 oz containers are useful. An 8 oz container will make a sauce. A 16 oz container will make soup for one.

The soup can be kept frozen for 3-4 months without hurting the quality. When you remove the frozen stock from the freezer, use fresh water to rinse off any ice crystals that might have formed on the top of the stock.

To make a soup, sauté cut up vegetables in olive oil until lightly browned, add chicken stock and parts of the chicken like a leg or wing. Simmer covered until vegetables soften. Serve hot.