My mother's favorite holiday wasn't Mother's Day.
She preferred Thanksgiving when family and friends gathered to celebrate our universal good fortune and nature's bounty.
But when we did celebrate Mother's Day, she preferred to eat at home rather than going to a restaurant. She had a short list of favorite recipes she wanted me to make. She loved salads, fried chicken and cake.
Some were variations on classics she taught me to make, like egg salad, others were desserts I had created that she always enjoyed, like a chocolate chip-banana cake with roasted walnuts.
Even though my mom barely weighed a hundred pounds and was just under five feet tall, she ate more than our teenaged sons. The last day I spent with her, she hungrily ate a Vietnamese
banh mi sandwich.
Here are some of the dishes my mom enjoyed.
Egg Salad with Grilled Vegetables and Crisp Bacon
Starting with my mom's basic recipe, I've added grilled vegetables and freshly chopped parsley for color and flavor. Crisp bacon gives a salty crunch.
Yield: 4 servings
Time: 45 minutes
Ingredients
4 farmers' market fresh large or extra large eggs
1 large carrot, washed, ends trimmed, peeled
1 ear of corn, tassels and husk removed, washed
1/2 cup Italian parsley leaves, washed, finely chopped
1 tablespoon capers, rinsed, finely chopped
2 strips of bacon, finely chopped, sauteed until crisp, drained
1 tablespoon finely chopped shallots or scallion
2 tablespoons mayonnaise
2 tablespoons olive oil
Sea salt and black pepper
Method
I like to put the eggs into a pot of cold water, turn the flame to medium-high, and cook them for 30 minutes. Many people say that's way too long but it works for me. The yolks come out flaky, the whites dense. Rinse with cold water, take off the shells, and roughly chop.
Slice the carrot into flat slabs about 1/4" thick and 3" long. Toss in olive oil seasoned with sea salt and black pepper. Do the same with the ear of corn. Grill until lightly browned all over or oven roast in a 400 degree oven for 15 minutes. Turn frequently to avoid burning. Let cool. Finely chop the carrots. Remove the kernels from the cobs.
In a large mixing bowl, combine the chopped eggs, carrots, corn kernels, parsley, shallots, and crisp bacon bits. Toss. Season with sea salt and black pepper. Add the mayonnaise and mix well.
Serve on bread, crackers, or lettuce leaves.
Variations
Add 1/4 cup roasted red pepper, finely chopped
Omit the bacon
Add 1/4 cup finely chopped, pitted olives
Roast 2 garlic cloves, tossed in olive oil, seasoned with sea salt and pepper until lightly browned, peel off the skins, finely chop the soft garlic and add to the egg salad
Add a dash of tabasco or a dusting of cayenne pepper for heat.
 Roasted Beet Salad
Yield: 4 servings
Time: 1 hour or more depending on the size of the beets
The beets my mom served when I was a kid were either boiled or canned. For some reason she never roasted beets until I made them. After that they were her favorite. Not soggy, the beats steam inside their skins and retain all their sweetness. They taste great and they're easy to make.
Ingredients
1 bunch of large beets
Olive oil
Method
Cut off the leaves and stems, reserving them to use later (a quick side note: after you wash them, if you chop up the leaves and stems, sauté them with olive oil, garlic and shallots; they'll caramelize and you can serve them as a side dish or tossed with pasta; they're delicious).
Thoroughly wash the beets to get rid of any grit. Do not remove the skin or cut off the root.
Preheat the oven to 450 degrees. Put a sheet of aluminum foil on a baking sheet. Place the beets in the pan, drizzle with olive oil, and bake for 45 minutes to an hour.
Turn the beets every 20 minutes so they cook evenly. Use a wooden skewer to test if they're done.
Let cool, then peel off the skins, cut off the root and the top part.
Serve them up the way you like--julienne, rounds, or roughly cut--put them in a bowl and dress with olive oil,
reduced balsamic vinegar, sea salt and black pepper.
Variations
Use a vinagrette dressing, add feta, sliced scallions, and chopped Italian parsley.
Top with roasted walnuts.
Add roasted carrots.
Add green grapes sliced in half.
Potato Salad with Vegetables
Yield: 4-6 servings
Time: 45 minutes
As a side dish, potato salad goes with any grilled meat or fish.
Ingredients
2 pounds potatoes (Yukon Gold or King Edward), washed
1 tablespoon Kosher salt
2 tablespoons grated carrots
1 tablespoon corn kernels
1 scallion, end trimmed, finely chopped
1 tablespoon Italian parsley, leaves only, finely chopped
1/2 to 3/4 cup mayonnaise (
preferably Best Foods/
Hellman's)
Olive oil
Sea salt and pepper
Method
Put the potatoes in a pot, fill with water to cover, add the Kosher salt, cover with a lid or piece of aluminum foil, and boil on high heat for 30 minutes or until the potatoes are cooked but still firm.
Remove the pot from the heat, pour off the hot water, refill the pot with cold water and let the potatoes cool.
Sauté the corn with a little olive oil for 5 minutes until lightly browned. Let cool. In a large bowl, mix together the corn, carrots, scallion, and parsley.
Peel the skin off the potatoes--save the skin for a breakfast sauté with eggs--chop the potatoes into dime-sized pieces, and add to the bowl. Toss all the ingredients together and season with sea salt and pepper. Stir in the mayonnaise and mix well.
Taste and adjust the flavors with more mayonnaise, salt, and pepper.
Variations
Use cilantro instead of Italian parsley.
Add celery or capers.
Add crispy bacon.
Add grilled shrimp.
Carrot Salad with Lemon-Soaked Raisins
Yield 6-8 (makes 1 quart)
Time 30 minutes
Ingredients
8 large carrots (preferably farmers market fresh), washed, peeled,

ends trimmed off
1 scallion (optional), finely chopped
1 small bunch Italian parsley, washed, dried, stems trimmed, finely chopped
2 tablespoons golden raisins
2 tablespoons lemon juice
1/2 teaspoon cumin
Pinch of cayenne
Sea salt and pepper
1/2 cup mayonnaise

Method
Soak the raisins in lemon juice and 1/4 teaspoon black pepper at least 30 minutes, preferably overnight Grate the carrots in a large mixing bowl.
Roughly chop the raisins, reserving the lemon juice not absorbed into the raisins. Mix together the carrots, raisins, parsley, and scallions.
Season with the cumin, cayenne, sea salt, and black pepper and toss. Add the lemon juice and mayonnaise. Mix well.
Variations
Use cilantro instead of Italian parsley
Add chopped capers
Top with roasted chopped almonds
Rosemary Fried Chicken
Yield: 4 servings
Time: 45 minutes to prepare, marinate the chicken overnight in buttermilk
Ingredients
2 whole chickens, washed,
cut apart, skin removed if desired, wing tips, bones, and skin reserved to make chicken stock
1 quart buttermilk
5 cups flour
1 tablespoon sea salt
1 tablespoon pepper
1/4 cup finely chopped fresh rosemary leaves
1/4 teaspoon cayenne pepper (optional)
1/4 teaspoon sugar (optional)
1/4 cup finely chopped yellow onion (optional)
2 tablespoons olive oil
2 quarts safflower or canola oil
Method
When you cut up the chicken, separate the two parts of the wing and cut the breast meat off the bone. Keep or discard the skin as you wish. The breasts can be left whole but will cook more evenly when cut into strips or tenders. The legs and thighs can be cut in half if you have a heavy chef's knife.
Toss the chicken pieces with olive oil and season with sea salt and pepper. Put the pieces in a container, add the buttermilk, 1 tablespoon of the rosemary, stir, cover, and refrigerate overnight.
Using a wok or deep frying pan, heat the cooking oil to 325 - 350 degrees or until a piece of parsley browns immediately when dropped in the oil. Before you begin cooking, prepare your counter. Have a slotted spoon or an
Asian style strainer ready. Lay two paper towels on top of a piece of brown grocery bag paper on a large plate.
Reserve 1 teaspoon of the rosemary to use just before serving.
In a brown paper bag mix together the flour, sea salt, pepper, rosemary, cayenne (optional), sugar (optional), and onions (optional). Remove one piece of chicken at a time.
Shake off the excess buttermilk, drop the piece into the paper bag with the seasoned flour, close the top of the bag, and shake. Repeat with all the pieces, assembling them on a plate or cutting board.
Cook the chicken in batches. Gently drop each piece into the hot oil, making sure it doesn't touch the other pieces so each one cooks evenly.
Turn over when browned on one side. Remove when golden brown and drain on the paper towels. The pieces will cook quickly: chicken tenders (breast) 2-3 minutes; wings 7-8 minutes; thighs & legs 10-12 minutes.
Just before serving, lightly dust the chicken pieces with 1 teaspoon of rosemary, sea salt and pepper.
If you are making deep fried vegetables like onion rings or broccoli florets, they cook even more quickly: thick rings cook in 30 seconds, thin rings in 5-6 seconds; broccoli in 30 seconds.
Soak the vegetables in the seasoned buttermilk for a few minutes, then process like the chicken pieces.
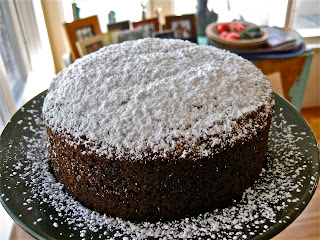
Banana Cake with Chocolate Chips and Walnuts
Yield 8 to 10 servings
Time 90 minutes
Ingredients
- 4 ripe bananas
- 1 1/2 tablespoons baking soda
- 1/4 teaspoon vanilla
- 2 eggs
- 1 cup plus 1 tablespoon sweet butter, room temperature
- 1 cup white sugar
- 1/2 cup light brown sugar
- 2/3 cup half and half
- 2 1/2 cups flour
- Pinch of sea salt
- Pinch of cayenne
- 1/2 cup raw walnuts
- 1 cup semi-sweet chocolate chips
Method
- 1. Melt 1 tablespoon of butter and paint the inside of a 9 x 3 round cake pan, then put the pan in the freezer for 30 minutes. (The frozen butter prevents the batter from sticking to the pan.) On a cookie sheet bake the walnuts in a 350 degree oven for 20 minutes, turning every 5 minutes or so; let cool, roughly chop, and set aside.
- 2. In a bowl mash the bananas with a fork, add the baking soda and vanilla. Stir well and set aside. In a mixer use the whisk to cream together the softened butter and both sugars. Add the eggs, mashed bananas, half and half and whisk until blended. Mix in the flour half a cup at a time, being careful not to over-beat. Remove the bowl from the mixer. Use a rubber spatula to blend in the walnuts and chocolate chips. Pour the batter into the buttered cake pan; it will only fill the pan half-way.
- 3. Bake the cake in a 350 oven for 60-70 minutes, rotating the pan every 20 minutes so the cake cooks evenly. Test to see if the cake is done by inserting a wooden skewer. If the top is browning too quickly, lightly lay a sheet of aluminum foil over the top. When the skewer comes out clean, take the cake out of the oven and place it on a wire rack for 30 minutes. Remove the cake from the pan, putting it back on the wire rack to finish cooling.
- 4. Just before serving dust the top with powdered sugar and shaved chocolate. Serve warm or at room temperature with vanilla ice cream or freshly whipped cream.


