Tuesday, November 21, 2023

Pickle Me Up! It's Thanksgiving!

Pickles are delicious anytime of the year. For Thanksgiving they are especially good. Their crunch and acidity counterbalances the deliciousness of gravy, mashed potatoes and roast turkey. 


For years I used cukes, the choice of traditional kosher pickles. One year when cukes weren't available, I "made due" with Persian cucumbers. Longer, more dense and thiner than Jewish style cukes, I discovered that Persian cucumbers kept their crispy crunch longer than the cukes I was used to. Ever since then, I use Persian cucumbers when I make kosher pickles.


In the 1920s, my great-grandfather made pickles on the Lower East Side of Manhattan. Grandmother Caroline used to tell stories about working in their little grocery store as a child. When customers would want pickles, she would hop off the counter and go out front to the pickle barrels and fish out the ones they wanted.

I never knew my great-grandparents. I never ate their pickles, but I must have brine in my veins because wherever I shop or travel, I am always on the look out for pickles.

Lower East Side Kosher Dill Pickles

When making kosher dill pickles keep in mind four very important steps:
1. Select Persian cakes or pickling cukes, not salad cucumbers, and pick ones without blemishes or soft spots.
2. Use only Diamond Crystal Kosher Salt with no addiitives. Taste the brine to confirm you like the balance of salt-to-vinegar. The flavor of the brine will approximate the flavor of the pickles.
3. Once the cukes are in the brine, they must be kept submerged in a refrigerated, sealed container.
4. Store the pickles submerged in the brine, seal and keep in a refrigerator where they will last for several weeks.
Ingredients
8 cups water
1-2 tablespoons kosher salt (to taste)
1 cup white wine vinegar or yellow Iranian vinegar (my preference)
5 dried bay leaves
10 whole black peppercorns
10 whole mustard seeds
¼ teaspoon pepper flakes or 1 dried Sichuan pepper, split open
5 sprigs of fresh dill
5 pounds cakes or small pickling cucumbers, washed, stems removed, dried
1 medium sized carrot, ends removed, peeled, washed, cut into thin rounds
Directions
1. In a sterilized glass jar(s) or plastic container(s), add the salt, water and vinegar and stir to dissolve. 
2. Dip your finger in the brine, taste and adjust the flavor with a bit more salt, water or vinegar.
3. Place the aromatics in the bottom of the container. Arrange the cucumbers and carrot rounds inside.
4. Pour in the brine being careful to cover the cucumbers. Reserve 1 cup of brine.
5. To keep the cucumbers submerged in the brine, cut out the bottom of a plastic cup the size of the opening and lay on top of the cucumbers.
6. The cucumbers have become pickles within 24 hours and will keep refrigerated for several weeks. If you like your pickles crisp, enjoy them within a week of pickling.


Monday, November 20, 2023

Thanksgiving Essentials - Brined Roast Turkey, Corn Bread Stuffing and Mushroom Gravy

 These are recipes I cherish. Developed over the years, with inspiration from my mom and shared work with my wife, we celebrate Thanksgiving in a year when there is such turmoil in the world. This Thanksgiving, as last year, we will celebrate Thanksgiving at the home of our son Franklin and his fiancée, Lauren. They generously set the table and cook most of the meal. We contribute dishes, to round out what's on the table. Enjoy being with friends and family. Enjoy what is good in your lives. Have a wonderful Thanksgiving. And, please, use the turkey bones to make the most-beautiful-stock-ever!

Thanksgiving was my mother's favorite holiday. She loved the chance to have her family and friends seated around the table, catching up, telling stories, and eating favorite treats.

Most of the time I do the cooking since I work at home and because we have a kitchen the size of a New York closet. Thanksgiving is my wife's day and I happily step to the side, working as a sous chef, assisting her in executing a meal that usually serves between 15-20.

Even though Thanksgiving is a lot of work, the key is organization. Writing up a menu is the first step, then a shopping list, and finally a time-line for the day before Thanksgiving and the day of the meal.

Along with those first steps, we cover the bottom of the oven with aluminum foil so clean up after the meal is easier. Cleaning out the refrigerator makes room for the turkey after we pick it up from the grocery store and so there's space for all those delicious left-overs after the meal.

Besides shopping at the grocery store we visit our local farmers' market to pick up fresh vegetables for the sides dishes: beets, sweet potatoes, lettuce, celery, carrots, mushrooms, Brussels sprouts, corn, leeks, and onions.

But the most important part of the meal is the turkey and no turkey is complete without a great stuffing.

Corn Bread Stuffing with Sausages, Dried Apricots, and Pecans

Over the years my wife has developed a crowd-pleasing stuffing with a contrast of textures: soft (corn bread), spicy (sausage), chewy (dried apricots), and crunchy (pecans).

Yield: 15-20 servings

Time: 30 minutes

Ingredients

2 boxes corn bread mix
3 celery stalks, washed, ends trimmed, leaves discarded
1 pound mushrooms, brown, shiitake, or portabella, washed, pat dried, finely chopped
2 medium yellow onions, peeled, ends removed, finely chopped
4 garlic cloves, peeled, finely chopped
1 stick sweet butter
1 1/2 cups turkey or chicken stock
4 Italian style sweet sausages
1 cup dried apricots, finely chopped
1/2 cup pecans, roughly chopped
Sea salt and pepper

Method

Make the corn bread the night before and leave the pan on the counter so the corn bread dries out. Use any cornbread mix you like. My wife uses Jiffy. It's inexpensive and tastes great. The instructions are on the box.

Saute the sausages whole in a frying pan with a little olive oil until browned, remove, cut into bite-sized pieces, and set aside. Pour off the excess fat. Add the celery, mushrooms, onion, and garlic into the pan with the stick of butter and saute. Season with sea salt and pepper. Cook until lightly browned, then add stock and summer 15 minutes.

Cut the cornbread into chunks and crumble into a large mixing bowl. Add the apricots, pecans, and the saute. Stir well and set aside until you're ready to stuff the turkey.

Roast Turkey

The most difficult part about cooking a turkey is size. Even a 15 pound turkey is larger than any roast you'll ever cook, so it's important to have somebody around to help strong-arm the turkey.

The rule of thumb about cooking time is 15-20 minutes per pound at 325 degrees but there are so many variables, you can also use a roasting thermometer and, our preferred method, jiggle-the-leg and if it almost comes off, the turkey's done.

There's a lot of talk about whether to brine or not to brine. In the Los Angeles Times, Russ Parsons argued for what he calls a "dry" brine, which means salting the turkey inside and out, then wrapping it in a sealable bag and refrigerating it for one to two days.

To prepare your turkey, in addition to the roasting pan, you'll also need pliers. I'm amazed at the work it takes to remove the heavy plastic gizmo that holds the legs neatly in place. 

Yield: 20-25 servings

Time: 7-8 hours

Ingredients

1 turkey, 23-25 pounds
Olive oil
Sea salt and pepper

Method

Unwrap the turkey. Remove the packet with the liver, neck, heart, and giblet. Use a pair of pliers to remove the piece of wire that holds the legs. It can be a real pain to get the wire off. Wash the turkey inside and out. Pat dry on the outside.

Reserve the liver to make a turkey chopped liver. Put the neck, heart, and giblet into a large saucepan with a lot of water, at least five inches higher than the turkey pieces. Replenish whatever water boils off. Simmer for 2-3 hours or until the meat on the neck falls off if you touch it with a fork. Strain the stock and reserve to use for gravy. Pull the meat off the neck and save to make turkey soup. Use the giblets in the gravy.

Preheat the oven to 450 degrees.

The next step is easier with a friend. Drizzle olive oil on the outside of the turkey. Using your hands spread the oil over the entire bird, front and back. Sprinkle sea salt and black pepper inside the cavity and on the outside.

To put in the stuffing, either my wife or I holds the turkey upright and steady while the other loosely packs the stuffing inside the large cavity, one handful at a time.

Use 8-12 metal skewers and kitchen string to close the large cavity. Carefully turn the turkey over so you can put stuffing into the top area. Use 6-8 skewers and string to close that cavity.

Use any kind of roasting pan. Whether you use a disposable aluminum foil pan or an expensive stainless steel roasting pan from William Sonoma, the result will be the same. The important thing to remember is the pan must be at least 2" wider than the turkey, otherwise as the bird cooks, its juices will drip onto the bottom of your stove and make a mess. To insure that the turkey browns evenly, you'll need a wire rack.

Place the turkey on the rack, breast down and put into the oven. After 30 minutes, reduce the temperature to 350 degrees.

After that, every 30 minutes, baste the turkey with the fat that drips down into the pan. If the skin starts to brown too quickly, put an aluminum tent over the top.

After 3 hours, turn the turkey over. With a large bird this is easier said than done because now the turkey is not only heavy, it's very hot.

Another set of hands is a big help here. My wife and I have choreographed this crucial moment. I lift the roasting pan with the turkey out of the oven, placing it on the cutting board. Michelle stands at the ready with a pot holder in each hand. As I lift the rack with the turkey, she removes the pan. I flip the rack with the turkey onto the cutting board, having first put a kitchen towel along the edge to prevent juices from falling to the floor.

We pour all the juices and fat from the pan into a basting bowl, scrapping off the flavor bits on the bottom of the pan to make gravy.

The rack goes back into the pan. The turkey goes onto the rack, breast side up. After a good basting, the turkey goes back in the oven, covered with an aluminum foil tent.

As the turkey continues to cook, if the wing tips and drumstick ends brown too quickly, wrap them in aluminum foil.

Continue basting every 30 minutes. When the turkey is finished, remove from the oven and let rest 5 minutes.

Carve the turkey on a cutting board, removing the wings first, then the legs, thighs, and the breasts. Either place the pieces on the platter whole, to be carved at the table, or sliced for easy serving. Open the cavities and spoon out the stuffing.

Mushroom-Giblet Gravy

While the turkey is cooking, start the gravy.

Yield: 15-20 servings

Time: 30 minutes

Ingredients

2 medium yellow onions, peeled, ends removed, finely chopped
4 garlic cloves, peeled, finely chopped
1 turkey giblet, cooked, grizzle removed, finely chopped
2 tablespoons chopped fresh rosemary, tarragon, or Italian parsley
1/2 pound mushrooms, brown, shiitake, or portabella, washed, finely chopped or sliced
2 tablespoons olive oil
2 cups turkey stock
Sea salt and pepper

Method

Saute the giblet, onions, garlic, fresh herbs, and mushrooms until lightly browned. Add turkey stock and the flavor bits you scraped off the roasting pan, simmer and reduce by 1/3. Taste and adjust the flavors. If too salty, add more stock and a pat of sweet (unsalted) butter.

Reheat before serving.

Turkey Stock

When you're eating Thanksgiving dinner, odds are you aren't thinking about your next meal, but I am. Admittedly, it's a bit obsessive, but before I sit down to join the dinner, all the bones and scraps go into a large pot filled with water. By the time we're clearing the table, the stock is finished.

Turkey stock is rich and flavorful. Perfect for making soups, stews, and pasta sauce, and like chicken stock, freezes beautifully.

Yield: 15-20 servings

Time: 1 hour
Ingredients

1 turkey carcass, skin, scraps
Water

Method

Put the carcass into a large pot. If any of stuffing makes it into the pot, all the better for flavor and richness. Cover the bones with water. Simmer 1 hour. Strain and refrigerate. Pick the meat off the bones to use in a soup or stew.

The stock keeps in the freezer for six months.

Wednesday, June 28, 2023

Tired. Hungry. Cook Like an Italian. Make Pasta with Sausages

Eating well is one of life's great pleasures. The other night I made a simple dish that can become more complex, depending on your preferences and ambition. Sautéed sausages and spaghetti tossed with cooked pasta and topped with freshly grated Parmesan cheese can be that easy. Delicious! 


For added flavor I also sautéed chopped onions, Italian parsley and shiitake mushrooms. With a little more energy I could have added broccoli florets sliced thin and tomato sauce and that's what I will do next time I make the dish. 

Earlier in the day I had made ground pork meatballs with an egg, bread crumbs, chopped an Italian parsley and chopped onions. I added those at the end because, why not? Sausages and meatballs together on pasta, come on, that's crazy delicious!

A couple of general suggestions. 

For the spaghetti (or penne or fussili) buy a high quality Italian brand. I love Borella. The pasta has a clean taste, with a good bite. 
For the sausages, you can use any kind of sausage you like. I prefer pork suasages with fennel made by Monte Carlo (3103 W. Magnolia Blvd Burbank CA 91505), an Italian deli in the San Fernando Valley. That's a long drive from where we live in Pacific Palisades, but when I am already in the Valley, I'll stock up and buy five pounds. 

I'm not going to eat five pounds of sausages all at once. Freezing keeps them "fresh" and available. To freeze the sausages, I dredge each sausage in olive oil, then I wrap each sausage in plastic wrap before placing the wrapped sausages into a sealable plastic bag. Even months later, the sausages taste fresh and delicious. 

There are many ways to saute the sausage. My preference is to first remove the casing, then using my fingers, I create quarter sized chunks of sausage. That way each piece of sausage has a crisp outside. Use a carbon steel or cast iron frying pan for best results. 

The recipe is for one. If you want to make the dish for two, double the ingredients and so on for as many people as you like. 

Pasta with Italian Sausage 

Serves one

Time to cook 25 minutes

Ingredients 

1 Italian sausage or any sausage you enjoy 

1/4 package of pasta, any shape you enjoy 

2 tablespoons chopped yellow onions, washed, peel removed 

2 tablespoons chopped Italian parsley, washed, leaves only 

2 large shiitake mushrooms or a mushroom you enjoy, washed, end of the stem removed, thin sliced 

4 tablespoons extra virgin olive oil, a good quality brand, preferably from Italy 

1 teaspoon kosher salt, preferably Diamond Crystal Kosher Salt, do not use any salt that has iodine 

1 garlic clove, washed, peeled, finely chopped (optional) 

1/4 cup pasta water, reserved from cooking the pasta

1/2 cup freshly grated Parmesan cheese 

Directions 

Place a large carbon steel or cast iron frying pan on a medium flame. 

Add 1 tablespoon olive oil. 

Sauté the chunks of sausage without the casing until browned on all sides. Remove from the pan. Drain on a paper towel on a plate. 

Discard the oil in the pan. 

Add 1 tablespoon of olive oil. Heat on a medium flame. 

Add the vegetables. Sauté until lightly browned. 

Return the cooked sausages to the pan. Remove from the heat and set aside. 

Fill a large pot with water. Season with kosher salt. Place on the stove on high heat. Bring to a boil. 

Add pasta and stir well to prevent the pieces of pasta sticking together. 

Cook 10 minutes or until al dente. 

As you drain the pasta in the sink, capture 1/4 cup of pasta water. 

Add the pasta water and cooked pasta to the sautéed vegetables.  Drizzle the remaining olive oil over the pasta and vegetables.

Heat on a medium flame. 

Toss well and reduce the liquid so the sauce coats the pasta. Plate the pasta and top with freshly grated cheese. Serve hot.

Saturday, March 11, 2023

Celebrate the Oscars and All Special Events with a Pisco Sour (don't have Pisco, use Vodka or Mezcal)

 I like watching the Oscars because it's a celebration of filmmaking, one of the world's greatest art forms. We'll watch the Red Carpet beforehand hoping to catch sight of our oldest son who represents one of the actors who is in contention. And, we'll watch the ceremony in real time. No pausing because we know our smart phones will be buzzing all through the ceremony sending us updates about who won for which category. 

So I spent today cooking. I made carrot salad with almonds and golden raisins soaked in rice wine vinegar and seasoned with black pepper. I also made Yukon potato salad with charred corn, carrots and parsley. And Cole slaw with green cabbage, carrots, chopped roasted almonds and the golden raisins, tossed in a sauce of equal parts mayonnaise and sour cream and a splash of rice wine vinegar. 

Tomorrow I will either make brown sugar spare ribs and kimchi chicken wings or fried chicken with honey-butter topping. 

I'll definitely open some of the clams I picked up at Whole Foods to take advantage of their 12 for $12 every Friday sale. I've been enjoying them with classic cocktail sauce and with a recipe I'm working on, a Viet-Chinese style sauce made with fish sauce, water, sugar, finely chopped shallots and lime juice. 

I top off the oysters with the sauce and a few cilantro leaves that I've deep fried and with a few tasty bits of fried prosciutto fat for crunch.

To toast the winners, I'll make a Pisco Sour, a drink that I had when we stayed at Hotel Jakarta Amsterdam. In the lovely Malabar at the top of the hotel with a view of Amsterdam across the River IJ, mixologist Tyrone Sullivan and bar manager Tarik showed me how they prepare their Pisco Sour.

Since I've been home, I've made the cocktail dozens of times. It's that delicious. Finding Pisco in Los Angeles isn't easy, so when I don't have Pisco, I use vodka or Mezcal instead. The taste difference is negligible. 

So, here it is, the best drink recipe you'll ever try at home and the one I recommend you make when you have something (like the Oscars!) to celebrate. 

All the best and, as the ad says, drink responsibly.

PISCO SOUR

Serves 1

Ingredients

2 ounces pisco

1 ounce lime juice, freshly squeezed

1/2 ounce simple syrup (made with equal parts water and white sugar - see below)

1 egg white (save the egg yolk to have for breakfast)

Garnish: Angostura bitters

Directions

To make simple syrup is, well, "simple." Since you can keep the syrup in the refrigerator for an indefinitely amount of time, make enough to use for many cocktails.

Place 1 cup white sugar in a small sauce pan. Carefully hand 1 cup of water. Do not stir. Allow the mixture to heat on a low flame until the sugar dissolves. Cool and place into a jar or bottle and reserve in the refrigerator.

Place the egg white, Pisco (vodka or Mezcal), simple syrup and freshly squeezed lime juice into a shaker. With the lid and top on, do a "dry" shake (which means you don't add ice). Holding the top and lid on, shake vigorously 25-30 times. Shaking caused the egg white to froth, which creates gas which will pop off the top if you don't hold on tightly.

Open the top to relieve the pressure, then open the shaker and add 4 ice cubes. Put the lid and top back on and vigorously shake again.

To serve, either pour into a martini style glass or into a large glass filled with ice. Drizzle a few drops of Angostura bitters.

Saturday, February 11, 2023

Super Bowl LVII Needs Super Pork Ribs and Amazing Kimchi Chicken Wings

 These are my favorite Super Bowl recipes. I've posted them before. I'm posting them again. Enjoy the Game.

If you've watched teams do battle all year, not knowing which teams will make it to Sunday's Super Bowl, the match-up of the Kansas City Chiefs and the Philadelphia Eagles is either your bucket-list-dream matchup or a big disappointment.

For the Game, I'll make favorites that can stand the test of time. Pork ribs and Vietnamese-style chicken wings. Delicious hot or room-temperature, I can serve them at half-time and any that are left will be delicious at game's end.

Kimchi Chicken Wings

Chicken wings are sold whole, the drumstick only or the two-bone part. If you prefer one part of the wing over another, buy only those. The whole chicken wing will be less expensive and the wing tips can be roasted and used to create stock.

I cut up the wings because the whole chicken wing is too difficult to eat. 


When you can, find preservative-free kimchi. I have been enjoying Mommy Boss napa cabbage kimchi. Read the label carefully because there are different kinds of kimchi, I would recommend only using cabbage kimchi without dried shrimp.

Serves 4

Time to prepare: Marinate overnight, prep 20 minutes, bake 60 minutes

Ingredients

2 pounds chicken wings

1 cup kimchi, without preservatives

1/2-3/4 cup brown sugar, depending on taste

1 medium yellow onion, washed, pat dried, peeled, root and stem removed, thin sliced from root to stem

1/4 cup kimchi liquid

1 tablespoon olive oil

Directions

Thinly slice kimchi and mix together with onion slices, brown sugar, kimchi liquid and olive oil.

Add chicken wing parts to marinade. Mix well. Place in a covered bowl or sealed plastic bag. Refrigerate over night.

Preheat oven to 350F.

Prepare a roasting pan. Line the bottom with aluminum foil. Because the drippings are sticky (and delicious!) I place a Silpat sheet on top of the aluminum foil so I can easily retrieve the delicious bits of caramelized onions and kimchi. Place a wire on top of the aluminum foil and Silpat sheet.


Place the chicken wings on top of the wire rack, allowing space between each part to allow for even cooking. Reserve the liquid marinade with the onions and kimchi.

Place wings into preheated oven.

While the wings are roasting, place the reserved marinade into a small sauce pan and reduce the liquid by 1/2 over a low heat.

Remove wings from the oven after 30 minutes.

Turn wings over and baste with reduced marinade, placing onion and kimchi slices on each wing.

Return to oven.

After 30 minutes, remove and check for doneness. The onions and kimchi slices should be lightly browned and beginning to crisp. The wings should be tender. If not, return to oven and continue baking. Check every 10 minutes for doneness.

Serve hot as an appetizer or on top of steamed rice. The wings are delicious at room temperature, perfect for a picnic. However they are served, have a good supply of napkins available.

Slow Roasted, Brown Sugar Pork Ribs
My mother taught me to make pork ribs with a thick coating of sauce sweetened with brown sugar and raisins. Eating those finger-licking ribs was one of my favorite childhood memories.
Everything changed on a busy research trip to Abilene and Fort Worth, when I ate at 25 restaurants in 36 hours. I fell in love with West Texas BBQ.
At restaurant after restaurant, I watched grill masters lay bundles of mesquite into their subcompact-car-sized smokers. With the heavy metal doors open, the wood crackled as flames enveloped the logs The grill masters seasoned their racks of pork ribs with thick, grainy coats of brown sugar and spices rubbed onto the meat.  Waves of dry heat radiated from the smokers. But the heat that would cook these ribs would come not from an open fire but from smoldering mesquite embers.
When the doors were closed, the blazing logs were starved of oxygen. The flames died and a delicate smoke filled the air. At that moment the grill masters loaded in the racks of ribs coated with sweetened dry rub. Hours later, the ribs were removed, their outer coating thickened to crispness, creating what grill masters call “bark.”
I loved those ribs even more than the ones from my childhood.
At home, without the benefit of a smoker, I experimented for years to duplicate that sweet-crispness. Nothing could ever recreate the wonderful mesquite smokiness but I did succeed in making ribs with bark as good as any I enjoyed in West Texas.

High heat versus slow cooking

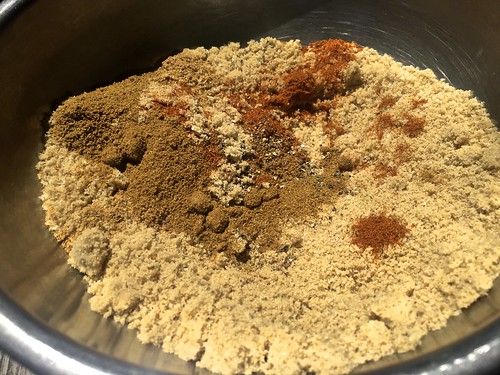
Mix of kosher salt, black pepper, brown sugar, cumin, coriander and cayenne for dry rub slow roasted pork ribs. Credit: Copyright 2016 David Latt

Mix of kosher salt, black pepper, brown sugar, cumin, coriander and cayenne for dry rub slow roasted pork ribs. 

Cooking with high heat is exciting. There is great pleasure in watching the pyrotechnics of an outdoor grill as sizzling fat catches fire.  Roasting at low heat in the oven lacks that excitement.
And yet, what happens in an oven set at 250 F has its own kind of magic. In the darkness of the oven, the waves of steady heat melt the fat inside the rack, tenderizing the meat and gently fusing the dry rub to the outside of the ribs.
The best magic of all is that the oven does the work. No standing over a blazingly hot grill on a hot day. Once the oven door closes, there is nothing to be done.
Walk into the kitchen and a savory-sweet aroma scents the air. Pull the baking tray out of the oven and press a finger against the outside of the rack. The soft pliancy of the meat has been replaced by a jerky-like crust as sweet as a crème brulee topping.

Slow-Roasted, Dry-Rubbed Pork Ribs

Rack of pork ribs, trimmed. Credit: Copyright 2016 David Latt
Cooking time depends on the size and thickness of the rack.
Buy good quality pork. Asian and Latin markets are often a reliable source of fresh pork products. Unlike the ribs sold in upscale supermarkets, the ribs in these markets will most likely be untrimmed.
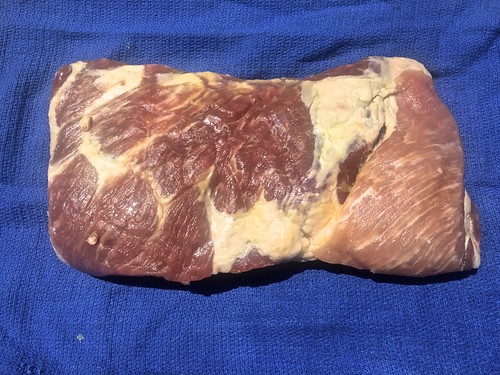
Above the actual ribs, the rack will have a top portion with boneless flap meat and a section with thick bones similar to country style ribs.  Another smaller piece of flap meat will stretch across the back of the rib bones.
Requiring only a sharp filleting knife and a few minutes, removing the flap meat and the top portion is not difficult. The flap meat is excellent to use in stir fries, slow roasted in the oven or grilled on the BBQ.
A white membrane is attached to the outside of the flap meat. Use a sharp filleting knife to separate the meat from the membrane and discard.
The flap meat and country style bones can be prepared in the same manner as the ribs.  They will cook more quickly and should be removed from the 250 F oven after a total of 2 to 3 hours depending on thickness.
While the rack of ribs does not have to be turned over, the flap meat and country style bones should be turned over after one hour for even cooking. After another hour, use kitchen shears to cut off a small piece of meat to test for doneness. Return to the oven if the meat is not yet tender.
To eat the country style ribs, have a sharp paring knife handy to help cut out those hard to reach tasty bits tucked between the bones.
The ribs can be cooked ahead and reheated. In which case, do not cut apart the ribs until ready to serve. Reheat in a 300 F oven for 15 minutes.
Prep time: 30 minutes
Cooking time: 6 to 8 hours
Resting time: 5 minutes
Total time: 6 hours, 35 minutes to 8 hours, 35 minutes
Yield: 4 servings
Ingredients
1 rack pork ribs, 4 to 5 pounds, washed, dried
3 cups brown sugar
2 tablespoons kosher salt
2 tablespoons freshly ground black pepper
¼ cup cumin
¼ cup coriander
½ teaspoon cayenne (optional)
Directions
1. Place a wire rack in the middle of the oven. Preheat to 250 F.
2. Select a baking pan or cookie sheet that is 2 inches longer than the rack of ribs. Cover the pan with aluminum foil for easy clean up. Place a wire rack on top of the aluminum foil.
3. Lay the rack of ribs on a cutting board, bone side up. Use a sharp filleting knife to remove the tough membrane on the bone side of the rack. Let the knife help you lift the membrane. Use your fingers to pull the skin off the bones and discard.
4. Do not cut off any fat.
5. In a bowl, mix together dry ingredients.
6. For easy cleanup, lay a sheet of plastic wrap on the cutting board. Place the rack on the cutting board. Layer a thick coat of the dry spices onto both sides, covering the meat and bones.
7. Reserve left-over dry rub in an air tight container and refrigerate for later use.
8. Carefully place the rack of ribs on the wire rack meat side up.
9. Put the baking sheet into the preheated oven.
10. Roast six hours. Remove from oven. Use kitchen shears to cut off a small piece and taste.
11. The outside should have a jerky-crispness. The meat inside should be moist and tender. The tapered end of the rack where the bones are small will cook faster than the rest of the ribs. Use the kitchen shears to cut off that section before returning the rack to the oven for another one-two hours. Be careful not to dry out the meat.
12. Once the ribs are cooked, remove from oven and let the meat rest five minutes.
13. Cut between the rib bones and chop into pieces any flap meat without bones. Serve hot with a green salad, Cole slaw, baked beans or freshly steamed vegetables.